Tents are a mainstay of convenience for sleeping outdoors. They come in all shapes, prices and sizes. Here, we bring you a collection of unique tents to add some flair to your next camping or survival excursion. You may even discover your new favorite go-to tent among these!

Tentsile Stingray Tree Tent

Looking up is usually the last thing you would think to do when searching for a tent in the wilderness, but the Tentsile Stingray Tree Tent can be pitched high above hiker’s heads. They are manufactured in quite a few styles, colors and sizes to choose from. A three-person tent like the Stingray 3 weighs about 19 pounds fully packed, so it is viable for a long hike. They even make models that can connect together, creating a makeshift village in the canopy! This style of tent can make a world of difference when having to set camp in damp or marshy areas, or in areas where the ground is very rocky. [$650]  Image from rei.com


Coleman Pop-Up Tent

Coleman Pop-Up Tent

Next up is the Coleman Pop-Up Tent. Unzip the carry bag, and poof . . . setting up camp is over. Coleman makes a great affordable tent, and this style makes camping for people that always struggle with setting up and taking down camp a breeze. It is also light, keeping at under 8 pounds for a 4-person model. Fumbling with tent poles can finally be a thing of the past, and at a price that won’t break your wallet for trying something new. [$100]  Image from coleman.com

Tahoe Gear Bighorn XL

Tahoe Gear Bighorn XL tent

Tahoe Gear brings us another great option: Bighorn XL. A teepee style tent fitting as many as 12 people can make those awkward, fumbling attempts at dressing in your tent a thing of the past. It stands 18 feet tall, and is just as wide. It also has a set of adjustable vents along the base to help regulate temperature and humidity, and a rain fly to shed water from the top, but that still allows for  the ceiling ventilation the original teepees that indigenous peoples were known for. [$151]  Image from tahoegear.com

Mountain Hardware Space Station


Mountain Hardware Space Station Tent

If you are looking for something more futuristic than classic, search no further than the Space Station. Mountain Hardware makes an extreme weather ready masterpiece that appears to be suited for another planet. And when near the peaks of the tall mountains this tent was designed for, you might as well be. They come with more than 10 adjustable vents and a sound structural design to help sweep wind up and over in the harshest of weather. It’s a spendy investment, but supercool. [$5,500]  Image from mountainhardware.com

Lotus Belle

Lotus Belle Tent

Lotus Belle makes tents that look out of this world as well, but more in the fairy tale sense. They are made of heavy-duty canvas and are built to last through being set up in the elements for much longer than your average camping trip. They come in lots of variations, but across the board you can expect much more headroom than your average tent. People often utilize them for visually appealing outdoor seating in their yards or at festivals, but they work great out in the woods as well. Shown is the 13-foot Lotus Belle Outback Tent. [$5,500]  Image from lotusbelle.com

Nordisk Telemark Tunnel Tent

Nordisk Telemark Tunnel Tent


Last on our list here is Nordisk. They are known for making higher-end tents, and the Telemark Tunnel Tent is a staple of their line. It may look more like a windsock than a tent, but it sheds water and wind like a dream. They come in a range of sizes, but they really excel in the smaller range. They are one of the easiest tents to pack long distances out there, weighing in at around 2 pounds for their 2-person model. It also sports some nice features, such as magnetic closing and a pole for converting the door into a tarp. [Contact for pricing]  Image from nordisk.eu

Next time you are looking at upgrading your camping gear or disaster supplies with a new tent, give some of these a glance. While they all excel in different areas, one thing is certain–they’ll all stand out.


All of us at some point have underestimated how cold it would be when we were camping or out in the backcountry. Maybe an unexpected storm arose and you just didn’t have enough clothes. One time when my in-laws were visiting we all camped out on the Oregon coast. This was in summertime, mind you, and we are aware that it would get cold there, even on sun-shiny days.

We warned everyone to pack well and bring warm clothes. As it turns out, we were all cold the whole weekend. Everyone needed one more layer, and we just didn’t bring enough warm clothes. I learned from that miserable experience. Sleeping when you’re cold is no fun, and waking up on a chilly morning when you’re already cold is downright unpleasant. Here are some tips for keeping yourself warm no matter where you are.

First things…bring enough clothes. Bring a hat and gloves. Bring a scarf if you have one. Bring extra socks. If your socks get wet and you sleep in them because that’s all you’ve got, you could be setting yourself up for hypothermia.

Investigate your sleeping bag. If you have a down-filled bag and you’ve had it for some time or it’s gotten heavy use, it might just not be as warm as it once was. The down compacts and clumps up over time, and those air pockets that work to keep you warm diminish. Even synthetic insulation will tamp down over time.

When it’s time to replace your bag, know that there are a ton of styles out there now. There are square cut sleeping bags which maximize space. Mummy bags (which I prefer not to use because I feel constricted), have narrow shoulders and hips to reduce weight. Some of them do have more room near the feet. And there are even hammock sleeping bags. Depending on your size, you may need a bag that is made for a larger person so that you have some room to move inside of it. Backpacking bags minimize weight, while sleeping bags for car camping maximize comfort. Decide how you’ll use the gear.

Whatever bag you choose, get a polar fleece liner. Slip it inside your bag. This not only helps keep your warmer, but keeps the inside of the bag more clean.

Stuff a pillow case with extra clothes for a pillow to avoid having to bring one. Some sleeping bags have a “pillow pocket” to allow you to do just this. Or, stuff it with an extra blanket.

You lose a lot of heat through the top of your head. Either wear a comfortable cap or invest in a bag with a built-in hood. The nice thing about the hoods is that they work just like a sweatshirt hoodie…you cinch the drawstring around your neck and it keeps your heat in and the hood on your head.

Add some long johns to your night clothing. Wearing an extra layer under your sweatpants or hoodie will help. Wool or silk longjohns are a little more expensive but really do work to keep you warmer.

Bring along a hot water bottle. If you have a campfire going as you ease into sleep, warm up some water and fill up your hot water bottle with it. Put it down by your feet or hug it to your belly and you’ll feel toasty for most of the night. I use a wrap on my water bottle that I sewed from an old towel with a drawstring from an old shoelace added. It insulates it so that the heat lasts quite a while.

Sleeping on an air mattress helps because you’re insulated from the cold ground. Sea to Summit makes an easy-to-inflate small and lightweight insulated air mat that we’ve tried and liked a lot.

What’s the best sleeping gear you’ve discovered? Let us know how you keep yourself warm. And yes, we’ve heard this before…sleeping with someone else does help!

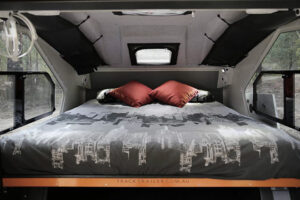
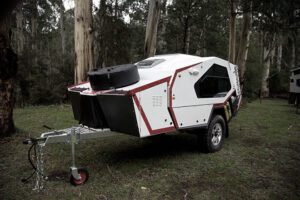
Don’t we all want to make it easier to just pick up and go? When it’s Friday and you’re ready to head out of town you want to be able to just head out of town. Not go home and sort through all of your camping gear and pick out what you need on this trip, then go to the grocery store and figure out where you’re gonna go. This Tvan MK4 by Track Trailer makes it super easy and is cool as heck. In fact, it’s so cool it’s been Camper of the Year by two magazines in 2009, 2011 and 2015.

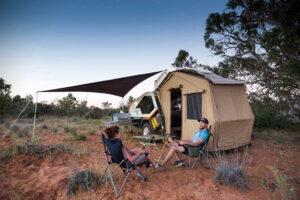
The Tvan was first released in 2000, so it’s been tried and tested. It’s made by an Australian company who is known for distinctive design and  off-road capabilities that would put some ATVs to shame. The MK4 is the latest version of this ultra-cool camp trailer and here’s why we like it. The camp trailer has a deployable tent that doubles the living space and a shade awning.

Believe it or not, a queen-sized mattress fits in the space with a large storage area underneath it. The large glass window is tinted for privacy. A 108 liter water tank (28.5 gallons) holds a good amount.

For this new version, the company has made the body sleeker. It’s got more storage and weighs even less.

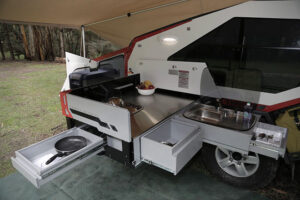
They’re offering two kitchen options: the Classic Kitchen, with a two-burner stove, integrated sink, pull out sink and cutlery drawer. The Premium Upgrade Kitchen offers 30% more storage locker space than the classic and twice the bench space. The Premium kitchen has a three-burner stove and a glass-topped stainless steel cooktop that’s probably way nicer than the one you have in your house. It comes with a bottle opener, folks.

There are many options for customizing so Track Trailer doesn’t give pricing. Instead, they want people who are truly interested to get in touch with them so they can give you all of the options to make a plan for this ultra cool camp trailer that is just what you want. I poked around a little, though, and found some prices. Hey, it’s a dream.

Images from tracktrailer.com.au

The teardrop style of camping trailers is a vintage look that is always in style. Combine a cool, old-fashioned trailer with seriously rugged features and we’re hooked. The TerraDrop Trailer by Oregon Trail’R is the perfect combination of real and rugged that we just can’t wait to try out in the backcountry.

The TerraDrop trailer is off-road capable, allowing it to be pulled by any vehicle anywhere you want it to go. Off-road suspension, all-terrain tires and a multi-axis couple make it sturdy as all get out, so you’ll want to do just that…get out! A large variety of upgrades and options from cabinetry to curtains make the TerraDrop uniquely customizeable.

Teardrop trailers have many advantages, including the fact that they are easily towed by most cars, meaning you don’t have to have a specialized vehicle for this. Keep your teardrop stocked and you’re ready to roll whenever the urge hits. Purchase the TerraDrop trailer for $15,000.

Price updated November 2, 2016: After this post published, Oregon Trail’R contacted us to let us know that they had recently updated TerraDrop’s base model configurations to include additional options that raised the starting price.

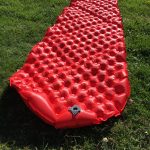
Leave it to the gear masterminds at Sea To Summit to take sleeping pads to the next level. Their Comfort Plus Insulated Mat combines serious technology and durable design to deliver a great night’s sleep, no matter where you find yourself.

Unboxing

Right out of the box, the sleeping mat was easy to use, lightweight, and packable. The design is all about function and would be totally at home in high winds, freezing snow, or the backyard tree-house. Unpacking and inflating the Comfort Plus mat takes less than a minute and could easily be done with gloves.

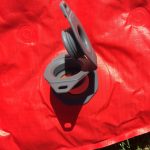
The mat is pretty straightforward from the start, but has some nice features to explore. The valve system to inflate and deflate could be new to some. One valve directs to a top layer and another to a lower layer, something I missed my first time checking it out.

Inflating

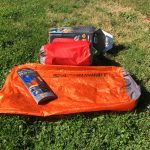
I used the Sea To Summit Air Stream Dry Sack Pump to inflate mine to test it out, but I also easily inflated the Comfort Plus mat another time with about 8 full breaths without the help of a pump. But, the moisture in your breath can end up reducing the warmth of your mattress. Click here to learn about the science behind sleeping mats.

The multi-function valves split between inflation, deflation, and a slow-release adjustment button. The two levels of inflation is a nice feature of this sleeping mat. Inflate one side all the way for maximum cushioning, then adjust the top layer to your tastes for body positioning. It seems a tad over the top for roughing it, but the ability to adjust the inflation with the touch of a button is a nice little feature.

Read more below the photos.

Comfort and Temperature

I tested out the tapered version of the Comfort Plus Regular size, and it was a bit small for me. I’m 5’10” and about 170 pounds, and I fit on the pad but without much room to move. I’d recommend the larger size for anyone around my size or larger.

The Air Sprung Cells are individual chambers and help the mat conform to your body. Movement and contours don’t affect the Air Sprung Cells nearby, allowing for more comfortable night’s rest.

The dual layers of sprung air cells have the nice perk of staying inflated even if one side gets punctured. I didn’t test the feature so I can’t be sure of how it performs in that way. This style also looks like it would provide a perfect layer of additional warmth from cold or snow-packed ground. The Thermolite insulation Sea To Summit uses is designed to prevent radiant and convective heat loss.

Packing

Deflating the Comfort Plus sleeping mat was a breeze, and folding it up for packing took no time. It’s design allows for a packing size way smaller than your traditional Thermarest-style sleeping pad. It would be perfect for long distance cycling trips and backpacking.

In a bug-out situation, when space is at a premium, this mat fits perfectly. The design is durable, sets up and breaks down quickly, and fits a wide variety of temperatures and environments.

Want to learn more about Sea To Summit and their gear? Click here to check out the Comfort Plus Insulated Mat and here to see the Air Stream Dry Sack Pump.

Using this practical guide to saying safe in a lightning storm while camping may save your life. Lightning can strike anywhere when a storm breaks out. Depending on where you’re located outdoors, a thunderstorm could be potentially dangerous.

The National Oceanic and Atmospheric Administration says that there is no safe outdoor place during a lightning storm. Their motto is, ‘When thunder roars, go indoors.” If that’s not possible, follow these tips to lessen your risk of lightning related injury.

Tent Tips

Do whatever you can to avoid setting up your tent under an isolated tree, or the tallest one. Stay away from broad open areas, high peaks, ridges, hilltops, elevated terrain, and metal fences. As pleasing as these camping spots might be, if a storm sweeps through, you’re not safe in your tent. Lightning is attracted to higher ground and tall objects. Research shows that lightning can be fatal up to about 30 feet from where a lightning strike hits the ground.

If you hear thunder, that means lightning is within striking distance. Leave your tent for a safer location immediately. Your safest bet is a fully constructed building with plumbing and wiring to ground out a strike, or an all-metal automobile (not a convertible). If you do shelter in a car, avoid touching the external metal of the car or the car parts that make contact with the external metal, such as the steering wheel or door handle.

If you’re in the backcountry and there are no buildings, move to lower ground and avoid the things that attract lightning. Also, if you’re camping in an open area, set up in a valley, ravine, or other low area.

Unsafe Structures and Buildings

Some structures you may encounter while camping are unsafe, such as picnic shelters and outhouses. The shelters have open sides and lack a method to ground lighting strikes. Outhouses don’t have the wiring or plumbing to ground the lightning strike.

Seek shelter in a low-lying area. Steer clear of tall objects like trees, electric poles, wires, and fences. It’s also advised you keep your distance from wet items, ropes, metal objects, and water. While these things don’t attract lightning, they’re prime conductors of electricity! The current from a lighting flash has the ability to travel far distances.

Wait Until it’s Safe To Go Back

Once the thunderstorm is over, wait at least 30 minutes before returning to your camping area or resuming your hike. Stay in a safe location for 30 minutes after you hear the last sound of thunder.

A large number of people have been killed because they didn’t wait long enough after the storm before resuming outdoor activities. Similarly, many people were struck by lightning because they did not seek shelter soon enough.

If in a Group, Spread Out

If you’re camping in a group, don’t huddle together even though that may be comforting. Spread out to avoid the lightning’s current traveling between people.

Want more tips like this? Sign up for our newsletter using the field below or on the home page.


These days, we use our smartphones for everything. They’re always with us, even when we’re in the backcountry. Smartphones are helpful but they shouldn’t be your line of defense if you’re out in the wilderness. Technology is never a substitute for knowledge, experience and safe planning.

When you’re hiking in the backcountry, cell phone reception is often non-existent. Even on hiking trails that are located close to cities, reception can be spotty due to the terrain. You should not rely on your cellphone to call for help or to guide you to safety. Many unprepared hikers have gotten themselves into more trouble by going further off trail in search of a cellphone signal, making it more difficult for rescuers to locate them.

The battery life on smartphones leaves something to be desired, and batteries can be drained quickly if the phone is constantly searching for a signal. To preserve battery life, turn your phone off or at least turn it to airplane mode while you’re hiking. By doing so, you will increase the chances that your phone will be available to use in an emergency.

While it is a good idea to carry your cell phone with you while hiking, you should not rely on it as part of your survival plan. Prepare yourself for unexpected circumstances and pack a map, warm clothes, a compass (make sure you know how to use it), a flashlight, extra batteries, a knife, signaling devices, shelter, a first aid kit, rain gear and fire-starting tools.

You should also carry more food and water than you think you’ll need, just in case you become lost or injured. Basically, you should be prepared to spend a night out in the wilderness, even if that’s not part of your plan.

Always let friends and family know where you’re planning on hiking and when they should expect you to return. Leave a note on your car with information about your itinerary. If you get lost or injured, stay calm and don’t make any rash decisions. Evaluate your situation and make smart decisions. If you have cell phone reception and you’re in an emergency situation, call 911. They will be able to track your location based on your call.


Buying a lightweight tent that is functional, convenient and affordable is ideal for camping or emergency preparedness.

What features should you consider for this type of gear?

Do you want a single-wall or double-wall tent?

Double-wall tents are more versatile and allow for greater ventilation and protection from foul weather. It has a rain fly that also adds extra warmth. A single-wall tent combines the tent body and waterproof fly into one fabric. This is what makes them lightweight and smaller to pack.

Single-wall tents might be somewhat easier to pack around, but condensation is known to form on the inside walls of the fabric over time.

Other variables for beginner’s to consider in choosing a lightweight tent is whether they want a three-season or four-season tent.

Do you need a 3- or 4-season tent?

Three-season tents withstand most climate conditions well, while the four-season tent tends to be double-walled and designed mostly for harsh winter conditions. Both are good options, but if you want a sturdy tent with a fly wall that adds that extra layer of protection from weather, the four-season tent might be your best bet. Keep in mind that it’s heavier and comes with thicker poles.

How much floor space do you need?

Living space and size are also crucial elements in your decision about which tent to choose. One thing to look for is tent designs with vertical walls because they usually have more interior space. These promote maximum space while being lightweight.

What are the elements of a well-designed tent?

Excellent design elements are another factor beginners should consider when selecting a lightweight tent. The best features of a tent you should look for are simple ones that include multiple doors, sufficient vestibule space, spacious headroom and air vents that cut down on condensation.

A lightweight 2-person tent is most popular and is versatile. It can be used for hikes done alone, or with a partner. Group tents aren’t as practical and lean towards being more crowded. Two-person tents are lighter in weight and provide the best features where practicality and cost are concerned.


You can’t walk another step, you feel a thunderstorm brewing, and it’s time to refill your energy stores. You need to find a safe and comfortable spot to make camp for the night. Here’s how to choose.

Where to Start Looking for a Spot

Hollows and valleys are generally the wettest, coldest, and foggiest spots for camping locations. Higher ground means rain will run off and is less likely to gather in your campsite.

Think about how long you’re planning on staying. If it’s just for a night you won’t need much room but you’ll need to stretch out and walk around if you’ll be in the area for more than a few days.

Look for small game trails, evidence of foot traffic from animals or people, and insect nests. Some you can’t avoid, but don’t put yourself in a place that’s a highway for animals or people that you might disturb.

If you’re on rocky terrain, be mindful of ledges that might pose a danger if you’re moving around at night. These areas can also be home to snakes and other critters.

Trees Can be a Friend and an Enemy

Don’t just look for shade. Some trees have dangling branches that could blow over and impale you, or destroy your belongings. If want to be near a tree, discern whether it’s safe enough to settle under first.

If you’ll need to dry clothes or hang bear-bags with food, look for branches that will be sturdy but are higher off the ground.

Be certain there’s enough space between you and a tall tree. Tall trees are magnets for lighting strikes. Keep an eye on low hanging branches that can pose a danger to eyes and your face when moving around in low light.

Read More: The 4 Types of Items Every First-Aid Kit Should Have

Where to Put Your Shelter

Steer clear of tall grass. The reason? Ticks, ants, and other pesky insects thrive in tall blades of grass, which could give you a real dose of misery.

If you can, set up your tent on a durable surface like rock, bare ground, sand, or gravel to protect fragile areas. Kick away any sticks and rocks that can bug you as you sleep. Try to avoid being on an incline, since you might find sleeping slanted pretty uncomfortable.

Before night falls look around for escape routes and potential cover. If you need to bolt for any reason during the night you’ll need to know where to go.

Water’s Benefits and Dangers

A smart bit of advice is to camp at least 200 feet away from water. Any river or stream can unpredictably flood if conditions are right. Also, land close to water tends to be marshy. This brings up another great tip —  not being close to water helps in avoiding an area thick with mosquitoes another insects attracted to water.

Look for access to clean water that’s moving. Stagnant water brings lots of bugs and bacteria. If you’re staying long-term, look for an area in which you can collect rainwater.

Research Any Required Permits or Permission

You may need to have a backcountry permit if you’re on land that’s a state or national park. You’ll need to apply for backcountry permits ahead of time or you may find yourself face to face with a very unhappy hiker or ranger.

If you’re on private property, get permission to camp. If the land owner finds you snuggled up without permission you could face fines and possible criminal charges.

Follow these tips and you’ll find yourself a campsite that you won’t want to leave. Always treat every campsite with respect and leave it cleaner than when you arrived.

Read More: Watch Out For These 3 Nasty Backcountry Bacteria