Some fire starter systems rely on char cloth. I wrote about the fire piston that I bought a while ago as one of some backup fire starter systems to have on hand. I like the fire piston, but it requires some type of tiny piece of tinder and char cloth is recommended. You can buy char cloth online for relatively inexpensively. But I’m here to show you how easy it is to make your own. I bought some online for about $7 and then paid $5 or so for shipping, so with these instructions here you can save that money and make a lot more char cloth than what you could buy for that amount of money.

Even if you don’t have a fire starter system that relies on char cloth, it’s still nice to have char cloth on hand. It catches fire easily and a large enough piece can stay lit long enough to get your other tinder alight.

Char cloth is made through a process called pyrolysis. this means that the material has been heated without the presence of oxygen, so it stopped short of burning up through combustion (which requires oxygen to occur). Because the material has been partially burned already, it catches fire readily and smolders with a low flame that makes it ideal for fire starting.

First things first … gather your materials. You need:

  • 100% cotton fabric. I went to the thrift store and looked in the men’s section until I found a 2 XL 100% cotton t-shirt and bought that for a couple of bucks. 100% cotton denim jeans can also work, but because the fabric is thicker it will take longer in the fire and you’re slightly more at risk that your material will combust rather than burn through pyrolysis.
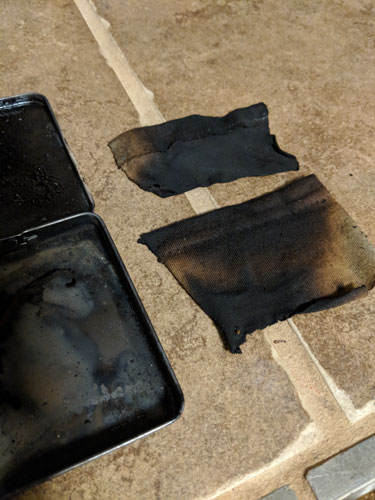
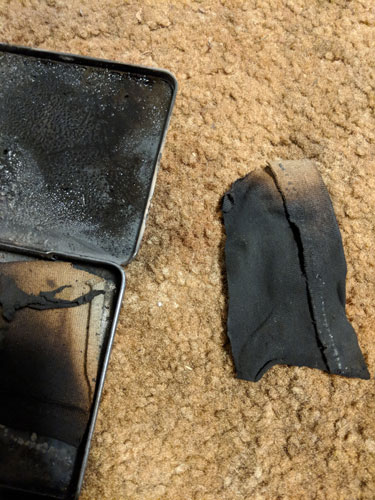
  • a sealable tin like an Altoids tin or metal bandaid can. I had a small cigar tin that I’ve been holding on to for the purpose of making char cloth.
  • scissors
  • You need a fire that’s already going.
  • tongs or something to get your hot tin out of the fire.
  • That’s it.

The size of the piece you can make is dictated by the size of your tin. A larger tin holds a larger piece of fabric. Cut your fabric to the size and shape of your tin.

Making your own char cloth
The unburned tin and the unburned 100% cotton fabric.

Most of the instructions will tell you to poke a tiny hole in your tin. This tiny hole allows the gases to escape without allowing oxygen or flame to get into your tin and burn up your material through old-fashioned combustion.

I made my first piece of char cloth in a tin with no hole at all, and it worked very well and in only 30 seconds or so. The other pieces I made after poking a tiny hole in my tin and I found that the pieces took longer to burn up completely. Try it first without a hole and see how that works.

The point of the hole is that you’re supposed to be able to remove the tin from the fire when there’s no smoke coming out of the hole. But if there’s other smoke in your fire (as there usually is) and it’s a very tiny hole, it’s pretty hard to tell if there’s smoke coming out or not. Some people make their char cloth on a smaller flame like a candle or a sterno flame and if you do that, you could see the smoke coming out.

If you have no hole, check your char cloth after 30 seconds. If you have a small tin, this may be long enough. Let the tin cool before opening, or else use tongs or something that allows you to open it without burning yourself.

I found that my tin wanted to pop open when it started to get hot, so I needed to make sure the tin lid was pushed on well. After the tin is cooled, open it, and you should see that your 100% cotton fabric has turned black, shrunk a little, and becomes fragile but not ashy.

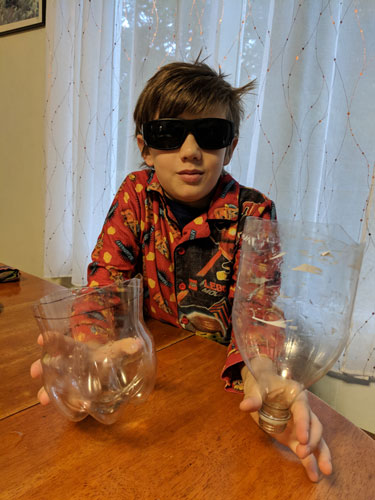
Here’s my son seeing how a piece of our char cloth burned.

Making your own char cloth
The char cloth slowly smolders rather than burns quickly.

Lifestraw or some other water filters are great, and if you have one you should use it. But what if you don’t have one?

I knew that you could make a water filter from some basic materials that you probably already have at hand like sand and a 2-liter soda bottle. I tried it out. While it worked, as you’ll be able to see from the photos, I can’t really recommend it as a great solution. The filtered water was barely any better than the muddy water that had been left to sit for a couple days. Let’s see how it worked out…

Start by finding an empty water bottle like a small soda bottle or a 2-liter bottle. If those aren’t available, you can use a milk jug or a laundry soap bottle. The idea is something that has a smaller top than it does a bottom. You will want to cut the item in half or collect two items, so that the item with the smaller top is draining into a collection reservoir of some sort.

If you cut a bottle in half, the idea is that the bottom half becomes the reservoir for the top half, which is turned upside down in order to be used. Save the cap! Here, my son demonstrates the cut bottle.

Cut a small hole in the cap. This is the water outlet. Some DIY water filters recommend filtering the large sediment through a coffee filter first. You can also accomplish this by filtering the large sediment through a t-shirt. Other DIY water filters will suggest that you tie on the coffee filter to the bottom of the spout, so that the coffee filter is the last filter that the water goes through before you drink it. Either way, it works. Personally I’d rather my water go through the finest filter last. And that also helps keep the sand from slipping through the hole in the lid.

Depending on what you have available, your water filter can have different layers. If you have charcoal from your firepit, you can use some large and small pieces. Pack it down fairly well. On top of the charcoal pour in fine sand, as fine as you can find it. On top of the sand pour in course sand. On top of the course sand pour in gravel. On top of the gravel pour on large gravel or pebbles. You want thick layers of each material.

I used only sand and then larger pea gravel-sized rocks. I put a layer of moss on the top. In some parts of the country you won’t find moss. In that case, you can use a thick layer of pine needles or other tree needles. Here’s mine:

DY water filter
Coffee filter on the bottom, sand, gravel, moss.

Pour your dirty water through the top and let it trickle through into the catch basin. If you’re not sure it’s clean of microbes, use the solar disinfectant method. This involves leaving the water in a clear bottle in the sun for a say or two, to let the solar UV light disinfect it. I’m told it works, although I’ve never actually tested it with giardia water to be sure. If you have, do let us know!

Here’s the water I used. The photo on the left shows the water after it had been left to sit and the sediment settled on the bottom after a couple of days. The photo on the right shows what the water looked like after I shook it all up.

I was actually surprised at how fast the water ran through the sand and coffee filter. I thought it would take a lot longer, but the water ran through fairly freely. Here’s what the water looked like after it had gone through the filter.

DY water filter
Filtered water.


I thought it might be improved by running it through a second time, but that did not make a noticeable difference.

DY water filter
Water filtered a second time.

As you can see from our comparison here, the filtered water was barely cleaner than the water that had settled. Bottom line…use a filter like this if you have the materials at hand and it’s not a hassle to gather the stuff and make it. Otherwise, just let your water site for a couple days if you can. If you’re worried about organisms in the water, boil it before drinking or use your water bottle to use the solar cleaning method. This can work by placing the water bottle in full sun so it heats up the water enough to kill the little critters.