I’ve long known that you could eat acorns. I just didn’t know how. I knew that Native Americans relied on acorns as a food source and that they somehow had a way to turn them into flour for little cakes.

I live in an area that has some oak trees, and eventually I became curious about how to actually utilize this resource. As you may know, there are numerous YouTube videos and chapters in books and website pages about processing acorns. The problem is, though, that once I started looking around, I found so much information I didn’t know what was reliable. There are many different ways that you can process acorns to make them edible. I wanted to know what really worked.

The resources I had also didn’t answer some basic questions such as whether it matters if the acorns are green or brown. One of the trees near me had acorns all over the ground, but they were all green. Does it matter if they have their caps on or not? I saw one resource on using acorns as a survival food that said acorn flour needed to be stored in the refrigerator or freezer. How will needing to keep the flour cold help me if I’m in a survival situation?

So when I saw that a group near me was offering a workshop on acorn processing, I immediately signed up. I was one of 10 students who spent most of a day with an instructor from a school of botanical studies (they teach herbalism and wild plant foods). We walked around an area with a lot of oak trees, learned to identify the different native species we have in my area (Oregon), and what the trees’ growth patterns can tell us about the environment. Regardless of what type of trees you have around you, all varieties of acorns are edible!

It’s fine to read books and watch videos, but if you have a chance to learn from a real instructor in person, that is highly preferable. You can ask questions, see, hear, smell and taste in a way that you never can by watching a video, no matter how detailed the instruction. Here’s what I learned about using acorns as a survival food. And to be honest, the acorn “mush” turned out so good that you might want to eat it all the time.

A grove of oak trees

Our group walked around to learn how the trees grow. We learned that Douglas firs and other fast-growing trees compete with oaks for light, and if an oak doesn’t get enough sun over time it will die. Knowing what trees you might need to remove can help you manage oak trees if you want to make sure that the trees in your area stay healthy and keep producing. We also learned that oaks have some years where they just don’t produce much, and some years, called “mast” years, where the nuts are abundant.

Our instructor also reinforced the fact that native people had collected acorns from right where we were walking for thousands of years. It was a great feeling to know that we were learning how to keep this craft alive and that we were learning how to truly eat food on a local level.

After we walked around and talked, we collected our nuts. We learned to avoid acorns that still had their caps on. We picked up only brown acorns, avoided ones that had a hole in them which was due to an acorn weevil (more on that delicious little protein morsel later!) and we avoided ones that were cracked.

A purple bag filled with acorns

Then we got to work processing them. Our instructor let us spend a few minutes cracking fresh acorns before telling us that it would never work to turn fresh nuts into flour! So that’s survival lesson number one…if you want to use acorns as a survival food, plan ahead. They must be dried before you can pound them into flour. You can let them naturally dry over months, you can use an oven, or a dehydrator, or put them by a wood stove. But either way they can’t be used right when you collect them off the ground.

Here are some photos of the dried nuts she had pre-dried for us to use.


As you can see, the whole nuts that you use should be free of mold and yellow or green discoloration. The variation in color is ok as long as they are “clean” looking.

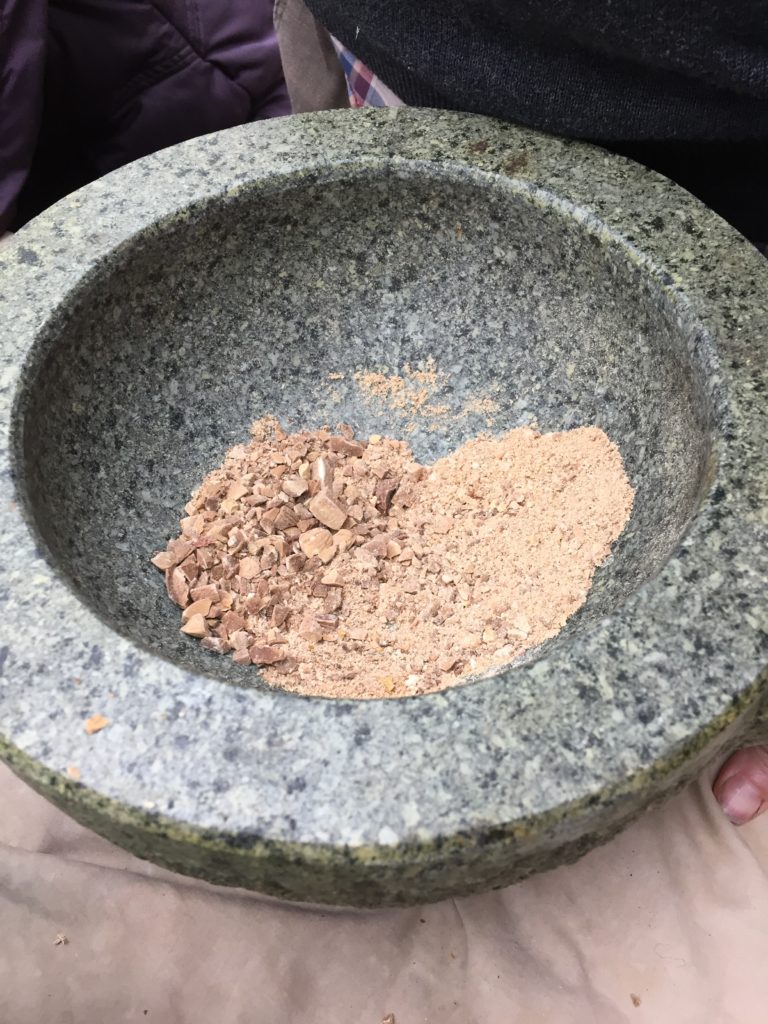
It takes about 20 minutes to pound about 1/2 cup of the nuts into flour using a mortar and pestle. If you use this method, pound, don’t grind. If you grind, you’ll release the oils, which will make it turn into nut butter. Maybe that’s what you want, but in this case we were going for finely ground flour.

If you have a meat grinder, that’s a much faster way to process the acorns. You’ll get some fine flour and some “chips” or “grits” size pieces. Those can be sifted out and finely ground by hand or cooked in a soup. You can also use a grain mill or some other technology if you have it available.

Acorns going through a meat grinder


After you start processing your nuts, you’ll sooner or later find one of these acorn weevils. Go ahead and eat it! The little protein morsel tastes like nuts. It’s slightly sweet, and only a tiny bit chewy along the edges. If no one else in your group is willing to eat them, then good, that’s more protein for you. I ate one, and I lived to tell the tale.


An acorn weevil crawling in a cracked acorn

After you collect the flour, it’s time to leach the tannins out of the nuts. The tannins are what make them bitter and you want to remove the tannins before you eat the nuts. There are many ways this can be done. One thing I was surprised to learn is that if you try to leach whole nuts (in the shell) it can take months. One person in the class had a brilliant idea of putting a bag of whole acorns into their toilet tank, so they were constantly being “flushed” through with fresh water. You can soak them in a large bucket. This takes months. Longer than you think. But the acorns are fine in the water for a long time. It’s better to store the whole nuts and process them into flour when you’re ready to use them rather than trying to store the flour. The flour won’t stay fresh for very long without freezing or refrigeration.

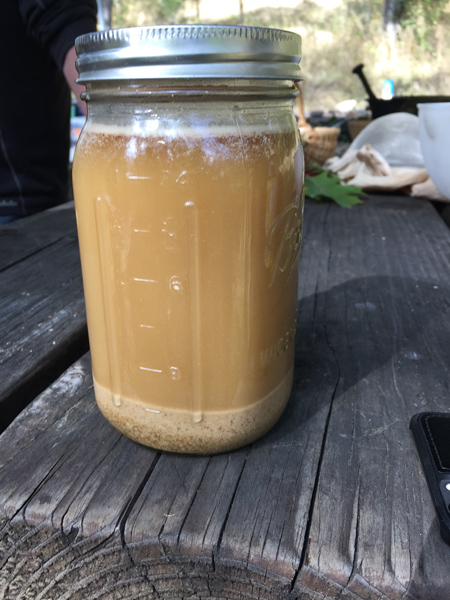
The smaller the acorn pieces, the faster they leach. We leached them in two methods…the first was to put the finely ground flour into a jar filled with hot water (photo 1 below). This could take about a week. You can taste it, and when the nut meal tastes good to you, you can use them. Replace the water when it turns brown. If you have the option, place the jar in a refrigerator because if it is hot out it can begin to ferment.

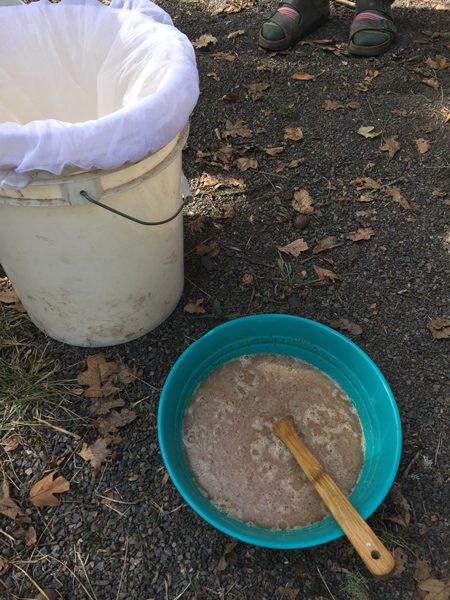
The second way was to put the flour into a bowl, pour water over it to cover and stir, then pour the whole thing through a mesh bag that you can get at a homebrew store (photo 2 below). Pour more water over the flour until it tastes good. You can “hot leach” the acorns by simmering them over a flame or on a woodstove. It can take over a day to leach whole nuts this way.


Our instructor had some already leached flour that we cooked with a little water into “mush.” One cup of flour will expand to about 3 cups of “mush.” The taste was good. It was nutty, but bland. The flavor really woke up when I put some salt on it. If you have any toppings like butter, onions, or salt and pepper, that would make the mush taste much better. But even with no flavorings at all, it was edible and even good, just bland.

Our instructor also had some already-prepared chili that she had made using whole acorns cooked in place of beans. The other ingredients were the same as what you would normally put into chili. The flavor of the chili was great, it was just odd because the nuts oxidized and turned the whole jar of chili a dark, inky black color. If you just focus on the taste and not the color, that too was good! The flour could be made into bread or pasta just as you would use any other flour.

One caution I have is that people can apparently be sensitive to acorns. My partner is allergic to pecans and walnuts, and when he ate the mush, he said it made his tongue feel fuzzy the same way that other nuts do that he can’t eat. So he’s not into using acorns as a survival food because of this. If anyone in your family does have a tree nut sensitivity, you might test it out and see if they can safely eat acorns before you plan for that to be a source of sustenance.

Acorn flour cooked in a pot with water.
Cooking the acorn mush.

Bottom line…I will collect acorns now whenever I have a chance to. Do your research, read your books and watch your videos. But if you get a chance to learn from an expert, do it. It’s the best way to really master a survival skill.

I took my acorn workshop through Columbines School of Botanical Studies.

Forms of food dehydration have been around for centuries. Modern devices have resulted in things like banana chips being popular snack choices in your local grocery stores. Now, there are many affordable options that can fit on your counter at home, allowing you to save leftovers from your garden and meals. Properly dried foods can last up to 10 years when stored properly. It can be an appliance that saves you the money you spent on it early in its lifespan.

With so many options and features however, it can be confusing to know where to start. Here we give you some simple things to keep in mind when searching for your first food dehydrator.

Size: Think about what you plan to do with it. If you aren’t in a hurry or don’t plan to dry large amounts of food at once, save the counter space, electricity, and money- and go with something more manageable. If you plan to use it often, have a big project in mind, or have cheap access to large amounts of food to preserve, go with something with larger food drying capacity. Just keep in mind that most foods take up to 12 hours to properly dry, so you are looking at 1-2 batches a day of food being dried for many foods.

Horizontal, or Vertical Layout: Food dehydrators work by applying controlled, warm air flow evenly over the food inside. Vertical dehydrators blow heat from a heating element from below the food, cycling the air up through the racks. Vertical is often less expensive than horizontal. But these are often less efficient because the lower trays get most of the warm air and the top trays get less. Vertical dehydrators work best if the trays are rotated on a regular basis, which means you have to monitor the drying more often to make sure everything is drying evenly than you would in a horizontal model. A horizontal model places the heating element off to the side or in the back, pushing the warm air across the racks evenly. Horizontal airflow can reduce mixing of flavors between different types of food being dried at once. It also eliminates concern of fluids dripping from foods down into the heating element, easing cleaning.

Features: They can come with all sorts of settings and functions, but there are 3 things to make sure your food dehydrator has. A custom timer is a must for perfecting your recipes and getting those banana chips just the right level of crunch. A temperature selector for optimizing heat for the type of food you are preserving (meats for example require higher temperatures to dry safely.) And finally, shoot for something that is easy to clean. If it takes as long to clean as it does to dehydrate your food, you won’t ever use it.

Price: Industrial quality dehydrators can cost you hundreds of dollars. You can find them for as cheap as $30. For a horizontal one like mine, that has some capacity and is easy to use, you can find similar models around $80.

Pick something that will fit your needs and experiment. If you are anything like me, you will have a pantry full of your favorite fruits, vegetables, and meats by the end of the month, and struggling to save them for eating in an emergency.

Image shown is a horizontal dehydrator with sheets filled with apple slices sprinkled with cinnamon.

A lot of preppers have seed kits, which is a smart investment because if there really is a natural disaster or a societal breakdown, being able to grow your own food is going to be a key to survival. Gathering wild plants can work but if you don’t find enough before winter hits, people who live in areas of snow and ice are going to be SOL.

Seeds stored for your garden should be heirloom varieties, because these will grow the same type of plant as the parent plant and produce seeds that will be the same type of plant as the parent plant, unlike hybrids, which product seeds that can be of varieties very different. But there’s another reason why a cache of seeds is a great idea for survival.

Many seeds can be sprouted easily. These sprouts, sometimes called microgreens, are highly nutritious, easy to grow and can give you fresh green food in a matter of days, even when you can’t fully garden with seeds in the ground. Sprouts are harvested before the first set of leaves develop from the seed. Microgreens are harvested after first leaves have developed. Sometimes, you need an inch of soil to grow microgreens unless you invest in a hydroponic tray. For this reason, sprouts are easier than microgreens.

Seeds are stores of nutrition that is meant to provide sustenance to the growing plant. When you eat the sprout, you are eating all of that stored nutrition. In winter, in areas of snow, or if you are having to move around from location to location and you either can’t risk putting seeds in the ground or you don’t want to, sprouting seeds is a great way to get nutrition and fresh food that you can pack along with you. According to the U.S. Department of Agriculture, a survey lead by Agricultural Research magazine reports that “microgreens contain considerably higher levels of vitamins and carotenoids—about five times greater—than their mature plant counterparts.”

Most seeds can be sprouted in a jar. There are also canvas sprout bags made specifically for sprouting. You can even wrap seeds in a damp towel. I have successfully used a plastic “clam shell” container that lettuce comes in from the store. The seeds need to be kept moist for the first few days until they sprout. After that, experts will tell you that the seeds/sprouts need to be washed daily in fresh water. This is true, however in a pinch you can also just mist with water or rinse once a day or every other day if you don’t have access to enough water.

Choose seeds that are fast growing and have a flavor you like. Experiment a little to find ones that you really like to eat. Having a bag full of several types of sprouting seeds and beans can give3 you the versatility of making fresh sprouts or growing an actual crop when you can.

Here’s what we recommend having on hand for microgreens and sprouts:

Mung beans – these make the traditional “bean sprout” that is often used in Asian stir fry, nice and crunchy

Alfalfa – what people commonly think of as “sprouts”

Beets – sprouts in 4 to 6 days

Mustard – sprouts in 3 to 4 days

Radish – sprouts in 3 to 4 days

Broccoli – sprouts in 3 to 4 days

All lettuces are good choices for microgreens

Even some grains and seeds can be sprouted, such as quinoa and sunflower seeds. We recommend experimenting first with these before you stock up on them as they can be more tricky.

Let’s face it, we’re not all gardeners. Some of us have green thumbs and some of us don’t. I personally am in the camp of the person who wants to have a green thumb but it doesn’t come naturally. I didn’t grow up in a household that gardened, unfortunately, and my mother only grows flowers. Which are nice, but in general, you can’t eat ’em.

So when I wanted to get a garden going at my own home, I had to do a lot of research. I was surprised at some of the basic things about gardening that I didn’t know. For instance, the difference between determinate and indeterminate tomatoes. The first few years of my gardening I never paid attention to the tags that came with the garden starts I bought, so I was always surprised with the mixed results I got.

Determinate vs Indeterminate Tomatoes

To explain that difference, determinate tomatoes are often called “bush” tomatoes because they grow to about 3 or 4 feet high. This is the type to plant if you are into canning, drying or freezing because the plant produces the entire crop within a one to two week period. These types don’t need cages or staking, although it is fine to use it. This is also an easy to care for plant because you shouldn’t remove the suckers from these types of tomato plants. Because they are compact and more “bushy” these are a good type of plant for a container. Most hybrid tomatoes and early varieties are determinates, because commercial growers like the ability to harvest all at once.

Indeterminate tomatoes are often called “vine” tomatoes and these grow to about 6 feet tall. The last time I tried to grow an indeterminate tomato in one of those flimsy little tomato cages, the cage darn near broke in half. These plants will produce crops all season long, until it gets too cold. They like the suckers removed, because it helps them focus their energy on the fruit-setting. Because these plants grow so large, they are not a good choice for containers. Most heirloom varieties are indeterminate tomatoes.

There are some semi-determinate tomatoes, that as you might guess have characteristics in between the two types. Now, about hybrids….

Why You Should Only Save Heirloom Seeds

Choosing seeds for the garden, particularly for the survival garden, is different than just selecting seeds based on growing a nice looking vegetable. You can choose from three varieties of seeds: open-pollinated, hybrid, and heirloom seed varieties. Each of these seed types has something to offer, but for the survival garden, you should choose heirlooms, and here’s why.

Many of the seeds that are commercially available are from hybrid plants. Hybrids are plants that have had the parent plants chosen because of some qualities that the grower wants to pass on in the next generation of plants. Seeds saved from hybrid plants will not be true to type, meaning they are genetically not going to produce you the same type of plant you saved it from. The genetics of what plants result from your seeds will not be predictable. Farmers who grow hybrid plants have to buy new seeds each year because the artificial pollination results in seeds that will either not produce the type of plant you were expecting or may nor product a plant at all.

Open-pollinated plants produce fruit when some pollination happens from natural sources such as bugs or wind. These plants can easily cross pollinate, which can cause a great variety of resulting fruit, particularly among things that cross-pollinate easily, like squash. If pollen is shared among different varieties, as in a small garden plot, your seeds will not be true to type. Again, this means that seeds you save from these plants will not produce the same type of plant you saved them from.

Heirloom varieties are seeds that were passed down because they were particularly good at what they do, whether growing in a particular area, producing an abundance, being cold tolerant, bug tolerant, drought tolerant, or some other good quality. Gardeners saved these seeds because they were reliable and good tasting. Heirloom seeds will give you the same type of plant as the parent plant. In some cases, particularly squash, in order to avoid open cross pollination, you should grow the plants in separate areas.

And here’s another tip….we don’t recommend buying survival seed packages, even though the advertisements can make these deals sound too good to pass up. Thousands of seeds for hardly any money and all that. The reason we don’t recommend this is because the varieties are chosen for you. There are numerous different garden “zones” based on weather and some varieties will not grow in zones other than the ones they are well suited for. Varieties that grow well in Florida will not grow well in Oregon. Your best bet is to get in touch with a nursery that is close to you and get a list of varieties that are tested and proven to do well in your growing area. Buy those, because they’ll be more likely to perform wherever you are. Also, selecting your own seeds means you can get the seeds that you and your family will actually want to eat. If no one likes radishes, even though these are super easy to grow, do you really want 1,000 radish seeds?

We’re getting to know the Bushcraft series of books, because we already had “Bushcraft 101” by Dave Canterbury, then checked out “Advanced Bush Craft: An Expert Field Guide to the Art of Wilderness Survival” by Dave Canterbury, published by Adams Media. Now we’ve gotten our hands on the new one, “The Bushcraft Field Guide to Trapping, Gathering & Cooking in the Wild,” also by Dave Canterbury.

This one published October 1, 2016, so it’s brand new. And it’s also our favorite of the bunch. We had some criticisms of the past two books because the information Canterbury presents is focused on East Coasters and some of the information he chose to highlight didn’t seem that important. I’m happy to report that this one is full of more useful information. However, for advanced preppers or hunters, again, some of the information will seem silly. For instance, a list of veggies that can be carried that don’t require refrigeration, including potatoes.

I did love the diagrams of makeshift water filters using a two-liter soda bottle as a water filter or the tripod method using cloth. Using the bottle method, you cut the top off a bottle and invert it, layering fine to course sand and rocks to slow let water filter through.

If you have the opportunity to pack for your outing, there are many tips here that you can use. For instance, packing a few bags of spices or a box of Old Bay seasoning. He provides a long list of his favorite recipes that you can duplicate, such as jambalaya using ground sausage and fresh crawfish. There are extensive pages about ways to build cooking fires and stoves out of found materials, and “beyond the basics” of hunting which includes how to reload spent shells. My favorite parts of this book, which I thought were lacking in the previous book, was the short section including full color photos of edible plants and the foraging chapter. There’s also a section that goes more in-depth into trapping and butchering, which are key considerations for living off the land. Useful in this regard also is the chapter on preparing unconventional foods, such as insects. I ate crickets once at a Mexican restaurant in Las Vegas, and I can tell you that in this case that box of Old Bay would come in handy.

The foraging chapter is great info, provided you know how to identify the plants he’s talking about. If you don’t know how to identify yarrow, it won’t help you to know that it can be used as a natural insect repellent. I think that’s what’s the biggest source of frustration about these books, is that they are a mix of beginner and advanced knowledge, and sometimes where the line is drawn is a little arbitrary. For instance, if you’re already including full color photos of edible plants, why not include one of yarrow as well. On the other hand, this puts a lot of the responsibility on you, the reader, to make sure you know what plants grow in your area and how you might use them.

To wrap things up in a fun manner, I liked that there is a chapter on unconventional cooking, which includes things like cooking cheese bread on your car engine. This is something I’ve always wanted to try to do and this recipe has given me the push to try it. This is a book that you can just flip through and get something out of, if you want to learn how to make a stove out a tin can, for instance. But I recommend taking the time to sit down and read it, because there are lots of tips and tricks that even if you know, you might forget. For instance, I’m going to go around and gather sap, knowing that sap will burn for a long time. I know that I could heat up a can of beans on a fire of sap if I needed to. And I never would have thought that I could use a windshield reflector, the fold-up kind, to fashion a stove.

One thing that I think is a bit confusing about these books is that people who may not realize what they are buying will think they are getting a survival book. While many of the techniques such as making stoves and building utensils out of saplings can definitely be survival skills, there’s too many other things in the book that are not specific to survival, like what spices to keep on hand. However, there’s enough that is new and useful in this book that I recommend it for people who hunt and like to fashion what they use out of things they find along the way, or for people ho have a genuine interest in doing things in an off-the-grid manner, even if it’s just a weekend at a time.

If you want to survive long-term, you better know what it takes to store food.

If you have been stockpiling food as part of your emergency preparedness plan, you need to make sure you’re using techniques. If not, you could be in for a nasty surprise just when you need food the most.

The shelf life of food products is affected by the following six factors, often referred to as the enemies of food storage.

Temperature
Ideally, food should be stored in a location with cool and consistent temperatures. Temperatures ranging between 40 and 70 degrees Fahrenheit are typically best for long-term storage. The quality of food suffers at temperatures that are outside of this range.

Oxygen
The presence of oxygen can be harmful for food storage. Oxygen can alter the flavor and consistency of your food. It can also cause food to become rancid. Oxygen-rich environments are conducive to the growth of bacteria and microorganisms that can be harmful to your health.

Moisture
Humidity and condensation can wreak havoc on your food supply. When stored food becomes damp, bacteria and mold can begin to grow, causing the food to spoil. Moisture can also cause some types of packaging to deteriorate. Proper packaging is essential to keep your food safe over a long period of time.

Light
Exposure to light can cause degradation of taste, appearance and nutritional quality of food. Fat soluble vitamins and proteins are most likely to be affected by light. Store your food in opaque containers.

Pests
Pests can be extremely destructive and wipe out vast quantities of your food supply. The types of pests you’re likely to encounter vary depending on your location.

Rodents are expert chewers and can make fast work of bags and other soft storage materials. When possible, use hard-sided containers such as aluminum, glass or other sturdy materials to keep the rodents from getting in. You can also put oxygen absorbers in your food to make it impossible for bugs and larvae to survive.

Time
The final enemy of food is time. Even foods that are packaged and stored under the ideal circumstances will be susceptible to degradation over time. There are some products that offer an extended shelf life and will stay edible for up to a few decades.

Food storage is sort of like an insurance plan to protect you in case the unthinkable happens. If you take the extra steps to ensure you’re protecting your food against these enemies of food storage, you will be well-prepared to survive in dire circumstances.

Simple canning basics for preppers will aid in making the process less intimidating. Canning is easy once you get the hang of it.

What’s Canning and Why Do it?

Canning is a procedure that applies high heat to food in closed jars to prevent spoilage from air and other microorganisms that eat away at it over time.

The best foods to can are fresh fruits and vegetables that have reached their peak stage of ripeness. Use only top quality ingredients when canning.

Be certain that all fruits and veggies are completely cleaned and scrubbed of excess dirt and chemicals before starting the process.

Important Do’s and Don’ts of Canning

Use a water bath canning process for high-acid foods, fruit juices, jams, jellies and other fruit spreads. It’s also the process for foods like tomatoes with added acid, pickles, relishes and chutneys, sauces, vinegar, and condiments. This canning process reaches a critical temperature of 212°F that’s crucial for killing dangerous bacteria.

For low-acid foods like vegetables, soups, stews, meats, poultry, ragouts, and seafood with pH values higher than 4.6, use a pressure canner. That will help the foods get hot enough (around 240°F ) to kill nasty bacteria.

Don’t vary the recipes for canning. Use recipes that give exact instructions on supplies used, ingredients needed, time, temperatures, and quantities, then follow them exactly.

Take your time with the process. It can take practice to master the exact techniques. Fill the water-warmed jar with food you want to can — leaving the recommended space at the top. Next, remove airflow bubbles by slipping a nonmetallic spatula between the jar and food. Press gently on the food to release trapped air. Do the same thing around the circumference of the jar.

Cleanliness is paramount when canning foods. Keep your work area spotless by using a clean, damp cloth to tidy the counter and jars.

Be sure to wipe the rim and threads of the canning jars with a clean, damp cloth. Center the heated lid on the jar. Screw the band down evenly and tightly until you feel some resistance.

Use high quality canning equipment. Strong towels, a jar lifter, quality canners, lids, and bands that seal tightly.

Don’t use any canning equipment that looks old, slightly broken, or unclean.

Never recheck the lids or re-tighten the bands for a seal while the jars are still hot. This is done after 24 hours.

Ensure the lids are securely sealed by pressing the center. Remove bands and clean the jars for storage only after you’ve double checked for a secure seal.

Don’t store your foods anywhere that has wide temperature swings or light penetration. Store them in a cool,dark, and dry place.

Congratulations! You now have canning basics for preppers and will have fresh food whenever you want it. In addition to having delicious food around in case of an emergency, this is a great alternative to buying store-bought foods … and it saves money!

It’s important to note that for best quality, you should consume canned foods within one year.

Are you well-stocked as part of your emergency preparedness strategy? The key for preppers is having a good supply of food, water, and other essentials on-hand in the event a catastrophic event presents itself. Do you have what you need?

Do you have food that is both nutritious and easy to work with?
When you’re doing your inventory, be sure that you have a mixture of foods that are flavorful and easy to work with. Check the nutritional facts to be sure they contain a variety of essential nutrients. Choose foods that don’t require extensive or special preparation.

  • White or brown rice is filling and full of vitamins and calories.
  • Items like beans, sugar, salt, flour, and oats are good base ingredients that make the foundation of a variety of dishes.
  • Canned goods like fruit and vegetables have a long shelf life and don’t require extensive preparation.
  • Peanut butter is full of protein and calories. It can also double as a sweet sugary treat.
  • Powdered drink mixes and multivitamins are easy ways to make sure you’re getting required nutrition in a quick form.

Do you have enough food for your specific needs?
It’s not enough to just have food stored away. You’ll need a plan and a menu for distributing foods equally and making it last over a period of at least 2 weeks. Take some time to consider who may be with you and their unique nutritional needs.

  • Store items like beans, rice and flour in large quantities, probably over 5 pounds of each. They last a long time, but are used for many things.
  • Canned goods are perishable once they’re opened. Have enough to use each can as a one-time meal.
  • Test your inventory by doing a trial run. Try to spend a weekend cooking only from your storage. You’ll notice the small things you probably forgot.

Do you have emergency supplies that fit your needs?
There are some supplies that are universal. Most you can find in the sporting goods section of a big department store. Take care to go with quality items, even though you’ll (hopefully) never need them. You’ll be glad you have top-quality goods when the time comes.

  • 5 gallon water containers. When you get home, fill it with tap water.
  • Buy a minimum of 250 rounds of ammunition for your main defense weapon. Add a cleaning kit to keep the firearm functioning properly and to battle degradation over time.
  • Pick up a good quality LED flashlight for your emergency preparedness inventory. Throw in some extra batteries and a bulb. In addition to that, get two boxes of wooden matches and several multi-purpose lighters. Be certain to date, use, and rotate. It’s a first in, first out process.

You’ll find these to be useful tools in aiding you to be prepared for the unexpected. Evaluate your inventory and do trial runs regularly to be sure everything is in order and up-to-date.