Did you know the CDC has stockpiled caches of nerve agent antidotes around the country? The CDC (Centers of Disease Control) states that if their nerve agent antidote is all in one place (like Washington, DC, for instance), that it would be too difficult to deploy the antidote in the event that there’s a need for a fast response.

The CHEMPACK antidotes treat the symptoms of nerve agent exposure. It works even if you do not know exactly what nerve agent is causing symptoms.

The antidotes must be administered quickly. The CDC keeps 1,960 containers that are available at the local level, strategically placed in more than 1,340 US cities. The government doesn’t make the exact locations for the Chempacks known. There’s little info available online that I can see that tells where they are.  Take a look at page 10 of this PDF I found and see what region you’re in: https://www.deadiversion.usdoj.gov/mtgs/drug_chemical/2008/jstear.pdf

If you want to know more about your particular state or county, start by looking at the state health department website. I had to do some digging, but I found a newsletter online that states, “Oregon is home to several CHEMPACK containers, which are strategically placed throughout the state.” That’s as much info on the location of the Chempacks that I could find. But, the CDC estimates more than 90% of the U.S. population is within one hour of a Chempack location. Do a little digging and see what you can find for your state. Call your local hospital or fire station and see if they will tell you if they have one or not.

On April 11, 2017, the FDA issued an Emergency Use Authorization (EUA) to permit the emergency use of the 2 mg atropine auto-injector, manufactured by Rafa Laboratories, Ltd. On May 23, 2017, FDA amended the EUA to also permit the emergency use of pediatric strengths (i.e., 0.5 mg and 1 mg) of this atropine auto-injector. These products are included in Chempack containers located across the United States. This specific atropine auto-injector is authorized for the initial treatment of symptoms of known or suspected poisoning in individuals exposed to nerve agents or certain insecticides (organophosphorus and/or carbamate).

Pretty much all the online resources of Chempacks all link back to this one page: https://www.cdc.gov/phpr/stockpile/chempack.htm

Photo from blogs.cdc.com. First responders prepare for Chempack training.

I’m not ready for chemical warfare. I read something recently that scared me straight. I live in the Pacific Northwest, where the biggest issue, and the one that everyone’s been focused on since this New Yorker Magazine article came out, is earthquakes. When “the big one” hits our area, according to experts, that 72-hour kit the Red Cross recommends will be nowhere near enough for anyone. The state of Oregon published a Resilience Plan for what the state would do in the aftermath of a big earthquake and those results were scary….Electricity is expected to be out for 3 to 6 months along the coast. Drinking water and sewer is expected to be out for 1 to 3 years along the coast. So, yes, that 72-hour kit will be needed, but you’ll have a long way to go from there. But that’s not what I started writing this post to talk about today.

Most of the emergency preparedness material that gets talked about in my area is about earthquakes, but I recently attended an emergency preparedness fair organized by the city where I live. It was a small fair, just a few tables, and pretty much all of what was there I already knew about. But I picked up a publication from Homeland Security that put a new threat into perspective…chemical warfare. This publication, simply called “Preparing Makes Sense. Get Ready Now.” is available as a downloadable PDF. There’s a section about terrorist attacks that might send tiny microscopic “junk” into the air. For example, an explosion that might make air unsuitable to breathe, or a biological attack that might release germs. I know in the back of my mind that these scenarios are possible, but I didn’t really let them in to my conscious before reading this pamphlet. The opening lines say, “Terrorists are working to obtain biological, chemical, nuclear and radiological weapons, and the threat of an attack is very real.” Great. Just what I wanted to start getting worried about on my lunch hour.

Here’s what Homeland Security recommends:
Use dense-weave cotton material to cover your nose and mouth as you breathe. Make sure the material or mask fits snugly so the air you breathe goes through the mask and not around it. Material that might work for this would be a few layers of t-shirt fabric, a handkerchief or a towel. You still need to be able to breathe through it. Obviously, get a mask if you can. And make sure you have a mask that is sized to fit your children.

Have heavyweight garbage bags or plastic sheeting and duct tape and scissors in your kit, and use this to tape off windows, doors and air vents. Precut them and label them so you can apply them quickly in the event that the air is unsafe to breathe.

Look out for public health reports of a wave of unusual sicknesses, as biological warfare might not be immediately apparent.

Signs of a chemical attack might include numerous dead fish or birds, and people coughing, having trouble breathing, or suffering from watery eyes. And we’re not just talking about allergy season. If you think the problem is in the building you’re in, go outside. Vice versa, if the problem is out on the street, stay put and put that plastic sheeting that you precut and labeled to work.

In the event of a radiation bomb or nuclear explosion, try to put distance between yourself and the focus of the event. Shield yourself if you can. Minimize exposure.

I admit that I’m unprepared for things like this to happen, and I’m guessing that lots of other folks are too. If you have already prepared yourself for these events let us know in the comments how you did it. Are gas masks part of your emergency supply kit?


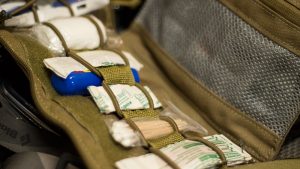
There are some pieces of gear that you stay impressed with even after having it for a while. It still surprises you, and still performs as advertised even after picking up a bit of range time and breaking in. When I first received the Vanquest FATPack 7×10 medical pouch, I was impressed with its organization features, but I wasn’t sure how well it would hold up since it was my first “tactical” pouch of any kind.

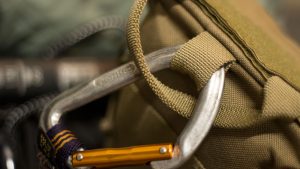
This pouch has held up well over the last year as part of my SAR kit (search and rescue). In my last review, I recommended securing the pouch shut with a carabiner to prevent the pull handle from snagging on anything if stored inside a pack. I’ve used an old quick draw to keep it closed and which also serves as a way to attach it to my harness if needed.

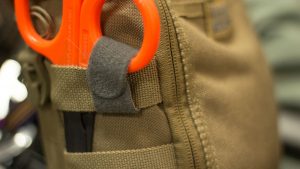
The Cordura construction has kept up nicely and hasn’t shown any signs of wearing or tearing after many months of being yanked in and out of my pack. The Velcro tabs on the exterior hold a pair of Milspec Monkey medical shears.

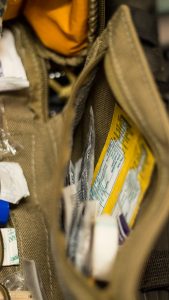
The pouch still can’t be beat when it comes to organization, even with new products coming to the market. The outside pouch holds several pairs of gloves so those are the first things I have access to when using the kit. The interior pockets hold a SAM splint, gauze, water for wound irrigation and other bulky items. The shock cord ladder on the opposite side carries a variety of bandages and smaller items. The small zippered pouch, which sets this pouch apart from many others on the market, is perfect for holding medications. The durability and organization of the FATPack alone make it an impressive piece of gear, but the form factor is also a plus. The thing looks great. My teammates, even senior members, think it’s a cool medical pouch.

Even though it’s a great and dare I say impressive medical pouch, Vanquest has found ways to update the design. The second generation of the FATPack 7×10 carries a redesigned shock cord ladder on the front flap, internal elastic loops for holding smaller items such as pens and chemlights and a low profile MOLLE panel on the front for added real estate for patches or a small pouch. The second generation of pouches comes with a red tab for identification as a first-aid kit. The main thing that intrigues me about the second generation is the redesigned shock cord ladder. It appears that it will still be able to hold small items, but also accommodate larger bandages when being used as a larger trauma or blowout kit. I still would like to see an option for all-red construction for the non-tactical market, but the addition of the identification tab does improve visibility in low-light situations.

In short, the FATPack 7×10 is still my top pick when it comes to a pouch that can fit both tactical and wilderness medical gear needs. I have yet to see a pouch that can match its capabilities. Purchase the FATPack from Vanquest for $43.

Experts are saying that the Zika virus is a dangerous threat to civilization. This quickly-spreading virus is transmitted by mosquitoes and has been suspected in causing thousands of cases of microcephaly, a birth defect.

Adults affected by the Zika virus may experience fever, rashes, joint pain and other symptoms. There is currently no vaccine or other treatment for the Zika virus. The only way to protect yourself from this dangerous virus is to avoid getting mosquito bites.

As mosquito season approaches, the threat will only increase. The following tips will help protect you and your loved ones from the Zika virus.

1. Wear long pants and long-sleeved shirts. It may be unappealing in the summer months, but to avoid Zika, you should wear closed-toes shoes and socks. Baggier clothes tend to offer more protection, as mosquitoes can bite through Spandex.

2. Stay indoors. If you leave your windows open, make sure you have secure window and door screens to keep mosquitoes out.

3. Remove areas of standing water around your home. Mosquitoes breed in standing water, so check your yard for any areas of poor drainage that may provide a breeding ground for mosquitoes. Standing water can accumulate in flower pots, buckets, bottles, plastic bags and tarps.

4. Add mosquito netting to your camping pack and/or survival kit in case you need to sleep outdoors. If you already live in an area that is at high risk for Zika, you may want to consider installing mosquito netting over your bed to reduce your risk of contracting the virus.

5. Use EPA-registered insect repellants. Follow the label on the product and reapply as directed. The Centers for Disease Control and Prevention recommends insect repellants that include any of the following active ingredients: DEET, lemon eucalyptus oil, picaridin or IR 3535.

6. Treat your clothing and other gear with permethrin, a chemical that repels and kills insects, including mosquitoes. Tents, camp chairs, packs and other gear can be treated with permethrin. Read the label before applying the product and only use it as directed.

7. Avoid Zika-affected areas. Many popular tourist destinations are affected by the Zika virus. The areas currently known to have active Zika virus transmission include (but are not limited to) Mexico, Guatemala, Colombia, Puerto Rico, Honduras, Venezuela and Brazil.

If you’re planning to travel this summer, check the CDC’s list of areas with active Zika virus transmission. Women who are pregnant or planning to conceive should reconsider any plans to visit Zika-affected areas.

Here’s a link to the Centers for Disease Control and Prevention’s website about Zika. This page lists the most current notices about travel to Zika-affected areas.

You can’t see them, but they’re there. Bacteria are lurking in wait to descend upon your intestines and blood, but the fight isn’t one-sided. Sure, they have the power to totally ruin your trip and your health, but a little preparation on your part goes a long way.

E.Coli Waits in the Water
Everyone from the casual hiker to the gnarly survivalist must know about drinking safe water. One (out of many) of the most common and dangerous bacteria found in contaminated water is E. Coli. This powerful bacteria punches well above its weight, causing severe diarrhea, abdominal pain, and sometimes kidney failure.

It’s best to just assume all water you encounter in the wilderness is contaminated by tiny nasties bent on your destruction. Keep your eyes and mouth closed when bathing or swimming in any questionable water, especially if it isn’t free-flowing.

When you’re out on your adventures, keep a record of where and when you gathered your water. When you find yourself at the doctor this will help to determine the course of treatment. It may help to notify authorities of contaminated water sources.

According to the Centers for Disease Control and Prevention, “If boiling water is not possible, a combination of filtration and chemical disinfection is the most effective pathogen reduction method in drinking water for backcountry or travel use.”

Stomach devastating Salmonella
Bacteria in food can not only ruin a fun outdoor adventure, it has the potential to cause deadly health problems.

Salmonella is a microscopic bacteria behind serious gastrointentianal infection known as salmonellosis. Ingesting this bacteria in under-cooked or contaminated foods can result in  cramps, headache, fever, vomiting, and severe diarrhea. Symptoms can wait to show themselves for 12-72 hours, so keep track of what you’ve eaten over the course of your trip. This will help with diagnosis if problems set in.

Take special steps to keep your utensils and hands clean. Wash dishes and hands with anti-bacterial soap before and after use. Cooking in the dark can pose hazards for under-cooked meats, so bring a small food thermometer to check food temperature before you dig in.

Lyme Disease Causing Borrelia burgdorferi
One of the most powerful backcountry bacteria, Borrelia burgdorferi, is carried by deer ticks. It causes Lyme disease, which affects thousands of outdoor enthusiasts ever year. When a tick is infected with the bacteria, it transmits it on through bites.

Immature ticks, called Nymphs, are the most responsible for passing along the disease. They are especially dangerous due to their size, less than 2mm. Outdoor explorers and ticks are most active at the same times,  the spring and summer months.

When you return from outdoor trips, give yourself a full body check for ticks. They like to hide out in dark places like armpits and the groin area. A bull’s eye rash is an early indicator of a tick bite, but other symptoms can include fever, headache, and muscle pain. If you see a tick or rash, grab your phone and take a photo. This way you can show your doctor to help determine spread and diagnosis.

They may be tiny, but you should treat bacteria in contaminated food, water, and insects like the towering behemoth of doom that they really are. Add cleaning products to your packing list and test out your backcountry recipes before you hit the trail.


Can you defend yourself and your family from an attacker who wants your last cans of food? Can you carry an injured child two miles back to camp? Can you make the hike to the nearest water? Answering these questions could mean the difference between life or death.

You don’t need a gym membership or a fitness video to start building your survival strength. You can add some fun and variety into your workouts to increase family time and build survival skills. There are a few easy moves that you and your family can do while enjoying time outdoors.

Move # 1- The Rock Pass Builds Teamwork and Balance
You can build survivor strength and increases balance in one move with the Rock Pass. Find a few friends or family to take a hike with you. Before you start, find a rock that each person can carry comfortably for a few steps. No one should be struggling too much to heft the weight. If the rock has some uneven sides that is even better. Practice standing in a circle passing the rock from person to person. Now head out on your hike just as you normally would but continue to pass the rock as you walk.

Set the goal of getting the rock for just a mile or for the entire hike. You’ll find that the task of passing the rock starts to be a real labor on your arms. Everyone will have to work together to accomplish the task. The Rock Pass builds teamwork, strength, and balance as your body works to complete a variety of tasks all at once.

Move #2- Tree Limb Pull-ups for a Survivor’s Upper Body
A quick hike in the woods reveals many ways to build your survival strength. Pull-ups and chin-ups are a great way to build upper body strength. All you need for this exercise is a tree limb that can support your weight. Do a few pull-ups with good form and then keep hiking until you find another good limb. Repeat the pull-ups and walking rest. These tree limb pull-ups will quickly build your upper body strength for any number of survival tasks like carrying heavy loads of firewood or building a shelter.

Move #3- Backpack Squats for Tree Trunk Legs
Pair your upper body workouts with lower body work. Take a minute to pack up your hiking pack with weight. Just use heavy clothing or blankets for a balanced load. With the full backpack on your back do several squats to test the weight. You should be able to do 5-10 without discomfort. Adjust your pack so it rests evenly. Do these around the house as you do vacuuming or dishes. Take your bag out for your hikes and stop every once so often to add in these squats to accelerate your cardio workouts. Backpack squats will increase your ability to walk long distances. Strong legs allow better climbing and carrying, both essential survival tasks.

These moves help you build the survivor strength required to live through emergency situations. They can also be done for free around the house or when you’re out for a hike, no gym membership required. Get the family out and practice them together for exercise with a fun twist.