In my area of the Pacific Northwest there are a lot of bodies of water. Depending on which way I drive home, I cross either two or three rivers via bridge. I’m always worried about what will happen if one or more of the rivers are damaged due to an earthquake or some other unforseen disaster. I have advised before that people who live in areas prone to flash floods that they get a rowboat that they keep at home, or a kayak or inflatable raft that they keep in their car.

I don’t have a raft yet but it’s on my prepper shopping list to get one to keep in the trunk of my car, probably along with an inflator of some kind. A decent two-person raft is a bigger expense than what my budget can usually handle. But just typing this out is making my blood pressure rise from nervousness, so getting one and having that piece of mind is definitely worth something! If any of you have purchased inflatable rafts or kayaks or something that you have stored for an emergency, do let me know what you bought and why.

Anyway, I have spent a lot of time thinking about how I would get home if the bridges I have to cross are damaged. The water in some places is not too deep, but it is definitely too deep to walk across.

If you do have to get across a river in an emergency, here are some things to know:

  1. The narrower spot may not be the best spot to cross. – if it’s narrower it can be deeper and the movement more swift. Flat, wide channels are usually shallower.
  2. Check what’s downstream. – If the water is fast, you’re likely to get swept away. Maybe there’s a danger down the way that you will want to know about.
  3. Does the bridge have an inspection basket? – I have never used an inspection basket to cross a bridge! But people have told me that some spans have baskets that are manually operated that go across the bridge on cables. These are used by inspectors to get up close to the bridge. If the bridge itself is impassable, perhaps the basket would still work. I welcome anyone who knows more about this to get in touch with more information to share.
  4. Read the river. Most of us will never be able to read a river as well as Mark Twain did, but there are some things that even non-river guides or riverboat captains can know.
    • Trees near the bank can have roots that trap you. Avoid these “strainers.”
    • “Pillow rocks” are smooth flows of water over an under-the-surface hazard.
    • Eddies can make the current unpredictable and fast.
    • Vs in the water indicate a submerged object.
    • foam piles churn the water around like a washing machine. It’s hard to paddle in these sections also, because the foam means the water is filled with so much air the paddle won’t go through it.
  5. If you do get washed away, position yourself so that your legs are straight and straight out in front of you. If you can, right?!
  6. Remove any unnecessary clothing or gear. Takes your socks off and pack them deep inside your bag to perhaps keep them dry.
  7. Position your pack so that you can release it if you need to so that you can get unstuck or it prevents you from being dragged under.

All of these things will help. But you must also know the water in your area. Try to investigate on maps where some crossings might be that may not be right where your bridge goes over. Know where other bridges are. If you can find a nearby bridge that is not damaged, that may get you across. If you can find a shallower place to cross that’s a few miles away even, you might go out of your way but you can cross more safely.

Luca Bravo on Unsplash

Lifestraw or some other water filters are great, and if you have one you should use it. But what if you don’t have one?

I knew that you could make a water filter from some basic materials that you probably already have at hand like sand and a 2-liter soda bottle. I tried it out. While it worked, as you’ll be able to see from the photos, I can’t really recommend it as a great solution. The filtered water was barely any better than the muddy water that had been left to sit for a couple days. Let’s see how it worked out…

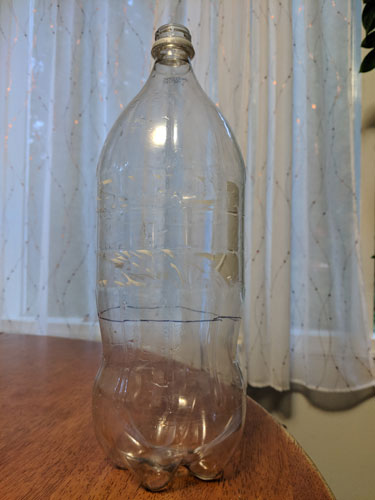
Start by finding an empty water bottle like a small soda bottle or a 2-liter bottle. If those aren’t available, you can use a milk jug or a laundry soap bottle. The idea is something that has a smaller top than it does a bottom. You will want to cut the item in half or collect two items, so that the item with the smaller top is draining into a collection reservoir of some sort.

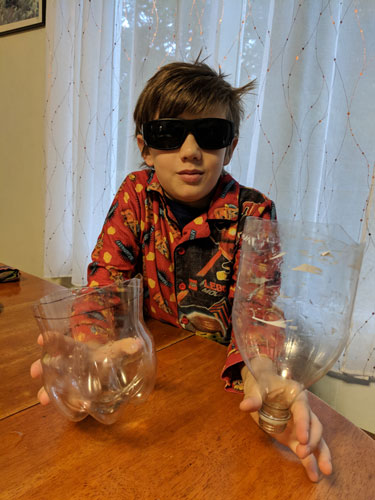
If you cut a bottle in half, the idea is that the bottom half becomes the reservoir for the top half, which is turned upside down in order to be used. Save the cap! Here, my son demonstrates the cut bottle.

Cut a small hole in the cap. This is the water outlet. Some DIY water filters recommend filtering the large sediment through a coffee filter first. You can also accomplish this by filtering the large sediment through a t-shirt. Other DIY water filters will suggest that you tie on the coffee filter to the bottom of the spout, so that the coffee filter is the last filter that the water goes through before you drink it. Either way, it works. Personally I’d rather my water go through the finest filter last. And that also helps keep the sand from slipping through the hole in the lid.

Depending on what you have available, your water filter can have different layers. If you have charcoal from your firepit, you can use some large and small pieces. Pack it down fairly well. On top of the charcoal pour in fine sand, as fine as you can find it. On top of the sand pour in course sand. On top of the course sand pour in gravel. On top of the gravel pour on large gravel or pebbles. You want thick layers of each material.

I used only sand and then larger pea gravel-sized rocks. I put a layer of moss on the top. In some parts of the country you won’t find moss. In that case, you can use a thick layer of pine needles or other tree needles. Here’s mine:

DY water filter
Coffee filter on the bottom, sand, gravel, moss.

Pour your dirty water through the top and let it trickle through into the catch basin. If you’re not sure it’s clean of microbes, use the solar disinfectant method. This involves leaving the water in a clear bottle in the sun for a say or two, to let the solar UV light disinfect it. I’m told it works, although I’ve never actually tested it with giardia water to be sure. If you have, do let us know!

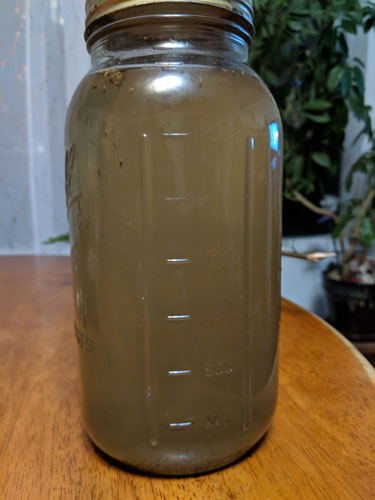
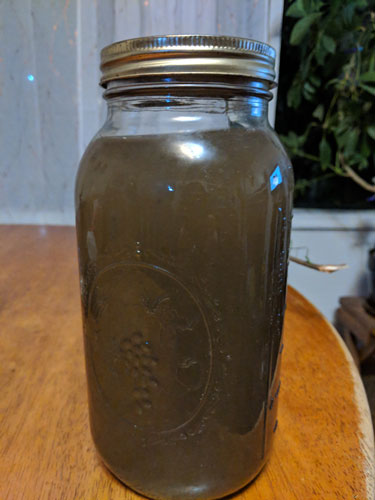
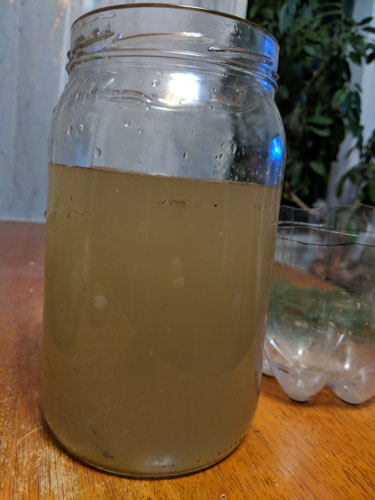
Here’s the water I used. The photo on the left shows the water after it had been left to sit and the sediment settled on the bottom after a couple of days. The photo on the right shows what the water looked like after I shook it all up.

I was actually surprised at how fast the water ran through the sand and coffee filter. I thought it would take a lot longer, but the water ran through fairly freely. Here’s what the water looked like after it had gone through the filter.

DY water filter
Filtered water.


I thought it might be improved by running it through a second time, but that did not make a noticeable difference.

DY water filter
Water filtered a second time.

As you can see from our comparison here, the filtered water was barely cleaner than the water that had settled. Bottom line…use a filter like this if you have the materials at hand and it’s not a hassle to gather the stuff and make it. Otherwise, just let your water site for a couple days if you can. If you’re worried about organisms in the water, boil it before drinking or use your water bottle to use the solar cleaning method. This can work by placing the water bottle in full sun so it heats up the water enough to kill the little critters.

OK, you might not be in the actual DESERT when there’s an emergency situation. But around my parts, the Pacific Northwest, it’s common to go for weeks in the summertime with no rain. I’ve lived in my city for 25 years, and over that time there’s been a noticeable shift in the weather patterns. When I first got here, the first summer we went the entire 3 to 4 month summer period with absolutely no rain at all and barely ever a cloud in the sky the entire time. After that, we’d regularly go the whole summer with little to no rain. Temperature-wise, it stayed in the 80s to 90s.

Now, 25 years later, we do get rain in the summertime on a more regular basis, but it is still very common to go weeks with no rain, and if there is rain it is a light mist that doesn’t do enough good for plants outside. And temperature-wise, it regularly gets up to and above 100 now. So even if there is a tiny but of rain, a stretch of a week or more of 100-degree weather is going to do a number on human bodies and any food plants we might be trying to grow.

This post isn’t going to cover the technology of catching rain–we covered that in a past post: “Build A Better Rainwater Harvest System”–but instead I will focus on collecting enough water to keep you alive. Humans can’t go longer than 3 days without water.

I’m also assuming here that you don’t need to be told to look in your environment for drinkable water in the form of lakes, streams or rivers. How about birdbaths or potholes? Fish tanks? Swimming pool? First things first, try to find fresh water wherever you can. If an emergency happens when you are in your home state, you probably already know where water sources are. If you’re on the road and something happens, it may be harder to find a river, lake or stream, but hopefully someone helpful will tell you. Look for areas where there are bands of trees or bushes where there aren’t any in other areas nearby. those bands of trees or bushes often grow alongside water sources.

Even in places where there does not seem to be much moisture in the air, there is always a little. A key way to collect water is to create a surface that water can condense on, and a temperature difference so that the water vapor in the air is induced to condense as vapor. Keeping a large sheet of plastic or a few plastic trash bags in your emergency kit is ideal for this. You can also create this temperature difference by collecting any moisture that is in the ground.

If you have access to salt water, you can boil it and collect the steam, which will condense into water vapor when it cools and is drinkable. This method also works with contaminated water. Based on what tools you have, you can create a “still” in a variety of ways. Take a container in which to boil the salt water. As the salt water boils, it will create steam. You want to be able to collect the steam and transfer it into a drinking container. Based on the gear you have, you might rig up a lot of ways to do this. for instance, you could cover your boiling pot with a metal screen and another cooking pot with a hole drilled into the side of it that would accept a high-temperature plastic tube. If you have a large garbage can you can place this over your whole system to contain as much steam as possible. Yes, you will lost some water along the sides of the garbage can, and perhaps you could rig up a way to collect that water as well. But some portion of the condensed water will go into your second cooking pot with the tube, and you’ll get water that way. You can buy distillation kits that will do this. They are often expensive, so if you can cobble one together yourself you’ll be better off.

You can also use the coolness of the ground to help you collect water. This is a good way to go if you do not have enough fuel to keep salt water or other contaminated water boiling. This is where it is helpful to have a large square of clear plastic sheeting and a vessel for holding your water–as large or as small as you have access to. Dig a hole in the ground, slightly smaller than the plastic you have. Dig a hole in the center of that hole that will hold the collecting vessel you have. Place the plastic over the hole and anchor it on all sides. Find a lightweight rock or something to cause the center of the plastic to dip down right above the collecting vessel. Now just wait. As the air underneath the plastic warms up, the condensation will begin to form and will drip toward your collecting vessel.

An even easier way is to simply place a clean cloth over the top of a boiling container of your water. The cloth will absorb the steam. Once the cloth has collected the steam, wring it out into your drinking container and repeat. The idea of drinking “cloth water” doesn’t sound that great, but it will work and does not require anything but cloth. Maybe the t-shirt you’re wearing.

If you have a tarp or trash bag, stretch it out on the ground and secure half of it with rocks. Fold the other half over to create a “pocket.” The vapor in the air will condense on the inside of the plastic. From there, you can carefully collect it. You can do this on a small scale, with whatever size plastic you have. Darker plastic will create more of a temperature difference and you’ll likely get more condensation.

An even simpler way to get a few drops would be to let the plants around you do the work for you. If you have an empty can or an empty water bottle with a small opening, simply place it over a plant stem or leaf of a tree. Secure it and seal it off as best you can. the plant’s transpiration will result in moisture collecting on the inside surface of your container.

Depending on where you live, you might need to cross water to get home or to your safe place in the event of a social or natural disaster. I live in the northwest, where there are two major rivers that bisect my town. Depending on the way I drive home, I may need to cross one, two or three bridges. I currently don’t have a water craft in my car kit, but I’ve thought about it.

I guess if there was a disaster, I’d hope that someone with a river boat skiff would be so kind as to ferry people across. I know that’s probably not very realistic. What stops me from buying a water craft, I guess, is the cost. Is a blow-up raft worth it if I keep it in the car and may never use it? I mean, they’re not super expensive. But a good one is also not super cheap.

I don’t know. Perhaps I’m getting closer to making an investment in some sort of water craft as an emergency device. Here’s this canoe I found…isn’t Kickstarter amazing?!

The “origami canoe” is in the pre-order stage. It’s called MyCanoe and it’s supposed to easily fold up into a small box that you can carry around or pack. The body of the canoe is made of custom polypropylene. There’s also a MyDinghy made of the same material. It has a 15-year UV treatment that is rated to 20,000 folds! I don’t know how the rate UV treatments based on folds, but that’s what the website says.

The 14-foot canoe assembles in 10 minutes, and folds back into a 37 by 25-inch box in 5 minutes. Given how many tries it takes me to fold a map, I’m just going to go ahead and double both of those times. But still, that’s pretty impressive.

MyDinghy is 9.4 feet long and 37 inches wide and weighs 52 pounds. It folds into a 37 by 8 by 25-inch box. The canoe is 14.7 feet long and 35 inches wide. It folds into a 37 by 8 by 25-inch box. The canoe also weighs 52 pounds. The canoe costs $1,400 with an $840 pre-order and the dinghy costs $1,350 from OriCanoe. The blow-up raft is starting to look a lot more affordable. But at least with this canoe, I wouldn’t be tempted to keep it in the trunk of the car and never use it!

MyCanoe Folding Origami Canoe
MyCanoe
MyDinghyCase
MyDinghy folded into a case

Images from oricanoe.com


Have you seen the many rainwater collection systems that stores and catalogs are selling? Firstly, not only are they expensive and more designed for looks, they’re not very efficient. Here in the Pacific Northwest, we live were it happens to rain a lot from October through to May. It rarely rains in the summer though, and when it does it’s usually not enough to even get a fraction of an inch of water on the ground. We needed a system that would make the most of our months of rain and let us use it even when it wasn’t raining.

First things first, it’s easy to make your own rainwater harvest system, so unless you really want to buy a system because you like its looks, you can make one for much less of the expense. One of the things that always makes me laugh is that the commercial rainwater harvesting systems always show round rain barrels. If you’re buying your container, try to get a square one.  Trash cans or food grade barrels can be used very well for rain water collection, and square containers fit more securely against a house or shed.

If you’re trying for water self-sufficiency, chances are you’ll need more than one barrel or container. Hook one up underneath each corner of your house, shed or barn. Link them up via tubes drilled in to the bottom so that when one fills up you can move the water down to the next one in line. That will help you to take advantage of the rainy periods and get as much water as you can even when one container becomes full.

Typically, rain barrel systems will tell you to install a hose on the bottom. This is great, but why not go one step further and install soaker hoses coming off the barrels? That way, you can turn on the spout from the barrel and the water will go where you want it. If you don’t have enough water in your barrel and you need to supplement with your water from your well or city water supply, then just aim your hose into the barrel and fill it up. Look for a hose manifold system that lets you attached multiple hoses to it. If each barrel has a turn-off switch, then you can hook the hoses up to whatever barrel you need the water from, or if you have your barrels in a row that are all hooked up together, you can move the water to whatever barrel has the hook up you want to use.

At home, I use timers on all my hoses so I don’t have to physically go out and water all the time and remember to turn it on and off. Soaker hoses are even better because they slowly direct the water right where you want it. You can even make your own soaker hoses by gathering up broken or cracked hoses and punching small holes into them.

In the event of an emergency, water is going to be one of the most sought-after commodities. It is essential to store water for emergency use (one gallon per person per day is the recommended amount), but you may be surprised at the sources of water you already may have in or around your home that can be tapped in an emergency.

Hot water heater
Your home’s hot water heater could be the storage container for 30 to 60 gallons of clean drinking water. In order to utilize this water though, following an earthquake, tornado or some other powerful event, your water heater needs to be protected from tipping over or something else falling over on it and crushing it.

A trip to your local hardware store and $15 from your wallet will get you a steel band designed specifically to attach your water heater to the wall so it won’t tip. Make sure the gas or electricity is off to the tank, and carefully open the valve at the bottom to collect the water.

Toilet tank
It may be possible to salvage the 3 to 5 gallons of water from the toilet tank. Don’t use water from a tank that contains colored disinfectant, because the chemicals are poisonous. Plan to boil this water before use.

Water pipes
To use the water in your pipes, open the highest faucet in your home, then collect the water that should trickle out from the lowest faucet in the home.

Ice in the freezer
This will not be a significant source of water, but don’t forget about it or accidentally spill it, as it could amount to several cups of clean water.

Washing machine
If you anticipate a water emergency, consider filling up your washing machine with clean water for use later.

Swimming pool or hot tub
Swimming pools are a huge water storage container but the chemicals used to kill germs are too concentrated for safe drinking. This water can be used for personal hygiene, cleaning and toilet flushing, which could help you stretch the supply of your potable water.

Water bed
As in swimming pool water, don’t plan on drinking this water but it can be used for other purposes.

Rainwater
Depending on the time of year and where you live, rainwater may not be an option. But if it is, this can help you stretch your other water resources. Rainwater can collect contaminants on its journey to your storage container, so consider boiling or filtering before use.

A nearby creek or river
Take a moment the next time you are driving around your neighborhood to notice the nearest natural water source. There may be a seasonal creek or small river you don’t think much about on a daily basis that could be an important resource in an emergency.


Floods are the most common natural disaster in the country. They can also be deadly if you’re unprepared.

It only takes a few inches of fast-moving water to knock down a person or lift a vehicle. If flash flooding is expected in your area, don’t risk getting stranded away from home.

1. Know where you’re going and how to get there fast.

If the area is already flooded, don’t try to go through it. Get to higher ground immediately. A car can be swept away by just one foot of moving water.

2. Keep your essential items with you and easy to access.

It is a good idea to keep a survival kit packed with food and drinking water in your vehicle. This kit will definitely come in handy if you’re stranded away from home in your vehicle. It is much safer for you to stay with your vehicle than it is to risk drowning by attempting to drive on a flooded street.

3. Get your information from trusted sources.

If you live in an area that is prone to flooding, pay attention to the National Weather Service reports to find out if floods are anticipated. Flooding may occur due to heavy rainstorms, tropical storms, hurricanes or other events that cause rivers to rise rapidly. Evacuations may be ordered if an extremely dangerous storm is imminent.

4. Get your home ready for any incoming floodwaters.

Prepare your home for flooding by moving important items and documents to the highest point in your home. Unplug your electrical appliances. If flooding is expected, don’t leave your pets at home alone. Flooding can cause roads to be inaccessible and leave you without a route home.

Storms that cause significant flooding often cause other problems. They may cause a widespread power outage or affect the local water supply. Stock your home with plenty of non-perishable food and drinking water. You should also have a flashlight, battery-powered radio and a first aid kit available in case of an emergency.

Don’t get caught unprepared for a disaster. Put together survival kits to keep in your home, office and vehicle. These kits will provide you with the basic tools and supplies that you may need to survive an emergency.

A man put his skills to use so he could survive a monster flood in Springfield, Missouri. Jonathan Whitworth is lucky to be alive after he drove over Wilson’s Creek in West Springfield.

It can happen so fast you don’t even realize the situation.

To hear Jonathan tell it to KSPR Channel 33 News, it was dark and rainy. Once he made it over the bridge, “there was water.” His truck was floating down the river as the front end “started going down and filling up.”

Time was ticking for Jonathan to get out of the truck. He tried opening the door, rolling down windows, but nothing would budge. He then remembered that he had a wrench set in the truck’s back seat. He reached for that to break open a window.

At first Jonathan tried jamming it through the window, but it “just bounced off,” he said. After he hit a second time it made a hole.

Jonathan made it out, but his true tale of survival was only beginning.

Swimming was useless due to powerful currents of water preventing him from moving. Jonathan was repeatedly going underwater in panic mode. He felt helpless and found himself at a point where Wilson’s Creek would determine where he’d wind up next. He saw the bridge and braced for a crash.

According to the article, the water usually was 10-feet below the bridge, but on that night it hit the top of the rails. Jonathan said he reached to the third one up and grabbed it. The fierce water pressure caused his grip to slip and he was stuck against the rock face.

Even then he wasn’t able to hold on long before he was going underwater. He thought sure he was a goner, but his son, Easton, made him determined to not give up. At that point, he took a deep breath and went under. He then popped up on the other side where a massive oak tree was there for him to grab onto until rescue teams arrived.

Surviving Rapid Floodwaters

In this case, the drivers was lucky to have tools in his truck that were accessible. Keep a survival tool in your vehicle that you know you can access quickly.

In rapid floodwaters, swimming isn’t always the best tactic. Try to stay on your back with your feet stretched out in front of you. This way you can protect yourself from hidden dangers.

Stay motivated by thinking of your loved ones. This story shows that you should never think a situation is hopeless. A desire to fight for every opportunity will give you more energy and strength.

Living in a modern society, it is easy to take our easy access to clean drinking water for granted.

That means it is extremely important to be prepared if access to water is restricted. Here’s how to prepare for a water shortage.

Know Your Storage Options

If you don’t want to be stuck without water in an emergency, the best thing you can do is establish a water storage plan. You can purchase large storage barrels to store water in your garage, shed or elsewhere in your home.

If space is at a premium, you can store water throughout your home using a variety of storage containers. Get creative and fill your unused storage spaces with containers full of clean water. You can store the water under your bed, in the back of your closet, or under your stairs.

Act quickly if a disaster strikes while you still have running water. Fill up your bathtub, sinks, pots and other large storage containers with water.

Know Your Available Water Sources

There’s only so much water you can store, so in the event of a water supply disruption, you’ll need to focus your efforts on finding and acquiring water. If you have the space on your property, use rain barrels to collect rainwater.

Before an emergency strikes, you should be aware of local water sources in your area. Identify local rivers and ponds that would be good sources of water. Note that natural water sources are not safe to drink, so you will need to be able to purify it before you drink it.

Know How to Purify Water Once You Get It

Although we can only survive up to a few days without water, we might not even make it that long if we drink water that is contaminated. Natural water sources tend to have bacteria, viruses and other potential toxins that can make us sick.

There are many options available for purifying water. If you have access to a heat source, you can boil the water to kill the harmful bacteria. Water filters, steri-pens, and chemical treatments such as iodine and hydrogen peroxide can also be used to purify water. If you don’t have any of these purification tools available, you can create a solar still to collect safe drinking water.


You need to know the critical steps and  how to avoid risking your own life in the process of rescuing someone from a fall through the ice.

If someone falls through ice and you’re the only one who can save the victim, don’t rush to them. Don’t go near the edge of where they are because chances are you’ll fall through as well.

How to Rescue Someone Who Falls Through Ice

1. Shout to the victim and get help by dialing 911. Hopefully you have a phone and a good cell phone connection.

2. Reach for the victim only if you can do it from shore. If not, extend a jumper cable, rope, ladder, or something that will float to the victim. Note, if the person starts to pull you in, release your grip on the object and start over.

One important tip … if a rope is tossed to the victim, have them tie it around themselves in case they’re too weak by the cold ice to grab a hold of it.

3. If you can, find a light boat to push across the ice to the victim. Be sure it’s pushed to the edge of the hole, get into the boat, and pull the victim over the bow.

A good piece of advice is to attach some rope to the boat so that others can help pull you and the person who fell through the ice to safety.

All other rescue techniques should be performed before attempting to venture on the ice to rescue a victim.

If the situation is too dangerous, call 911 and repeatedly reassure the victim that help is on the way. Encourage them to fight to survive. It’s vital you adhere to these safety techniques so the dire situation doesn’t result in two deaths.