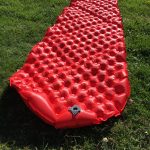
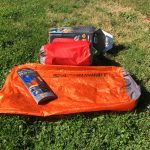
Leave it to the gear masterminds at Sea To Summit to take sleeping pads to the next level. Their Comfort Plus Insulated Mat combines serious technology and durable design to deliver a great night’s sleep, no matter where you find yourself.

Unboxing

Right out of the box, the sleeping mat was easy to use, lightweight, and packable. The design is all about function and would be totally at home in high winds, freezing snow, or the backyard tree-house. Unpacking and inflating the Comfort Plus mat takes less than a minute and could easily be done with gloves.

The mat is pretty straightforward from the start, but has some nice features to explore. The valve system to inflate and deflate could be new to some. One valve directs to a top layer and another to a lower layer, something I missed my first time checking it out.

Inflating

I used the Sea To Summit Air Stream Dry Sack Pump to inflate mine to test it out, but I also easily inflated the Comfort Plus mat another time with about 8 full breaths without the help of a pump. But, the moisture in your breath can end up reducing the warmth of your mattress. Click here to learn about the science behind sleeping mats.

The multi-function valves split between inflation, deflation, and a slow-release adjustment button. The two levels of inflation is a nice feature of this sleeping mat. Inflate one side all the way for maximum cushioning, then adjust the top layer to your tastes for body positioning. It seems a tad over the top for roughing it, but the ability to adjust the inflation with the touch of a button is a nice little feature.

Read more below the photos.

Comfort and Temperature

I tested out the tapered version of the Comfort Plus Regular size, and it was a bit small for me. I’m 5’10” and about 170 pounds, and I fit on the pad but without much room to move. I’d recommend the larger size for anyone around my size or larger.

The Air Sprung Cells are individual chambers and help the mat conform to your body. Movement and contours don’t affect the Air Sprung Cells nearby, allowing for more comfortable night’s rest.

The dual layers of sprung air cells have the nice perk of staying inflated even if one side gets punctured. I didn’t test the feature so I can’t be sure of how it performs in that way. This style also looks like it would provide a perfect layer of additional warmth from cold or snow-packed ground. The Thermolite insulation Sea To Summit uses is designed to prevent radiant and convective heat loss.

Packing

Deflating the Comfort Plus sleeping mat was a breeze, and folding it up for packing took no time. It’s design allows for a packing size way smaller than your traditional Thermarest-style sleeping pad. It would be perfect for long distance cycling trips and backpacking.

In a bug-out situation, when space is at a premium, this mat fits perfectly. The design is durable, sets up and breaks down quickly, and fits a wide variety of temperatures and environments.

Want to learn more about Sea To Summit and their gear? Click here to check out the Comfort Plus Insulated Mat and here to see the Air Stream Dry Sack Pump.

The rush of whitewater rafting is pure adrenaline. Your first sight of the set of wild rapids just down the river sends your heart rate pumping. You grip your paddle with knuckles as white as the water.

While floating rivers and group river rafting tours are a common outdoor pastime, they aren’t without some inherent dangers. It’s that risk that makes rafting so exciting. Here’s what to do if you find yourself thrown from the raft, and into the whitewater.

1. Get properly equipped before you even hit the water.
If you’re going out with a guided tour, take a look over their equipment first. Helmets and maintained life jackets are crucial to whitewater safety.

Wear light clothing that dries quickly and won’t take on bulky weight when they hit the water. Items like boots and denim jeans get wet, they’ll weigh you down if you’re in the water.

Keep your life jacket snug and buckled, making sure that you can breathe but the jacket itself can’t be pulled up to your neck. If it’s too loose, or not buckled, you run the risk of turning the life-saving device into a hazard instead.

2. If you’re in the rushing water, keep your legs out in front of you.
If you’ve been tossed from the protection of a raft and into the whitewater, keep your legs out in front of you to defend yourself from rocks or tree branches hidden under the surface.

If your life jacket and helmet are secure, your legs are the first line of defense as you tumble downriver. Lie on your back with your knees bent and your body flexible.

Push off of obstacles or, if they’re unavoidable, try to use the momentum of the water to push yourself up and over anything in your way.

3. Help your rescuers.
If possible, keep in contact with those still in the raft. Watch for them to throw you a flotation device or rope that you can hold onto.

When you’ve reached your rescuers, allow yourself to be pulled in face first. This way, you’ll be able to bend at the waist and roll into the raft.

Before venturing out into water, whether in a raft or while wading for angling, keep the dangers in mind. If you stay calm and follow these tips, there’s plenty of fun to have out on the water.

What’s in your wallet? Odds are good whatever it is can’t afford a spot in one of these posh post-apocalyptic hideouts.  They’re only available to those who have dropped  thousands of dollars to book a reservation. You’ll be slugging it out with the rest of us topside, punching your neighbor’s teeth out to get your hands on a 4-pack of batteries at the looted out Rite Aid down the street.

If you could afford the reservation fee ($50,000 for yourself, another $50,000 for your spouse, and $25,000 for the kid) you’d be safe and secure in the deluxe underground bunkers created by Vivos Group. Better empty the life savings now; spots are filling up fast.

Recently profiled on Vice, Travel Channel, and CNN, and Forbes this multi-million dollar project is gaining attention, and investors.

They call themselves “the ultimate all-risk protection and life assurance solution for high net worth families”.

What’s inside? They’re fully outfitted with generators, storage areas, and private lounges, ensuring that anyone willing to pay up has one year of savory beef roasts in the oven and pillow-top mattresses while the rest of the world watches the brittle bones of their loved ones fall to ashes.

Don’t worry, well-strapped Europeans can still scamper underground should catastrophe strike. Vivos Europa One offers sumptuous safety for only 34 well to do families.

Think you’ll save your cash and hunt down the hidden Hiltons after catastrophe instead? Good luck.

The locations of these high-society digs are top secret, all the better to keep the roving mobs of the poor and destitute from finding the comfortable caches. The rich rest easy though; upon completion the bunkers will be less than 100 miles from many of America’s largest cities, meaning wealthy urbanites will only need to survive the drive.

Vivos Group claims it will be peace, love, and harmony for weeks on end after the reinforced hatch is pulled closed for the final time, finally closing the wealthy off from the ragged, bothersome proletariat masses.

Robert Vicino, founder of Vivos Group, claims that experienced law enforcement and military professionals are among those who’ve reserved the sacred spots. These tough guys will presumably keep their protective prowess, fending off the blithering nutcases banging on the door to threaten the dainty movie stars cuddled within.

Vicino brushes away any concerns of social and emotional breakdown in the ritzy hideaways by only selecting applicants that can fill the required roles in a polite society. Detention cells and tribunals will help to keep the peace, assuming the privileged guests are willing to ignore years of opulence and allow a judge from Queens to admonish them for taking one too many Sprites from the mini bar.

The Vivos website claims that “The collective abilities and skills of like-minded members helps assure the long-term survival and well-being in a post-apocalyptic world.” Looking past the severe lack of data collected from post-apocalyptic worlds required to reinforce such a claim, a million-dollar high stakes selection process wreaks of science fiction camp to the highest degree. 

Seemingly ripped directly from the pages of the prophetic novel World War Z, in which high-end Hollywood elites and fat cat CEO types find the familiar power structure quickly reversed in the wake of a zombie apocalypse, Vivos stands to make piles of cash without providing any facts, figures, or reliable data to support their validity.

If we keep considering popular culture as a reference point, the only people who spend millions of dollars to carve out spacious caves filled with control panels, aquariums, and lounge chairs are the supervillians James Bond tussles with in his spy adventures.

Is it money well spent? If what you’ve been reading sounds the least bit enticing, then probably so. To quote the Vivos website again, “…a small backyard shelter would be a lonely existence, virtually impossible to defend and survive in”. If you’d rather rub elbows with 20 or so fellow elites in an underground Bond villain’s apartment rather than in a shelter created and outfitted by your own hand, than the expenditure is worth it.

Photo Credit: Vivos Group

Whether you’re fighting for your life, camping, or hiking with the family, you might find yourself in remote areas, often alone and probably fatigued. You need to protect yourself in every scenario.

Many outdoor enthusiasts choose to carry a concealed handgun for protection. There are just a few things to keep in mind to keep it secure and safe.

Keep it Concealed and Secure
There are plenty of holster options for active concealed carry. Compression shorts and tops for both men and women keep a firearm concealed and close-fitting, ensuring you’ll be comfortable.

Clothing made specifically for concealed carry has secure pockets made specifically for compact handguns. Make sure that they offer trigger protection and keep the gun secure.

Avoid holsters that cause discomfort and chafing or ones that deter you from moving naturally and engaging in strenuous activity. You won’t carry regularly if it’s annoying or painful.

Clean your handgun regularly to limit the effects of sweat and moisture on the frame and action parts.

Stay Aware
It shouldn’t stop you from getting out for fresh air and exercise, but remember that being in remote areas makes you a target. The backcountry can be full of sounds and activity, but try to be aware and get in tune with what’s happening around you.

Stick to well-known trails if you can. Getting lost will only make you anxious, and that can lead to bad decisions. Bring a friend along on your active pursuits to deter opportunistic attackers or animals.

You can carry concealed to be protected no matter where your outdoor lifestyle takes you. A compact handgun is very capable of protecting you while running, hiking, bicycling, and bugging out in a crisis.

Of all the disasters that can befall us wilderness explorers, few shake our boots quite like the snakebite. A recent Gallup poll asked Americans what it was they feared the most, and snakes topped the list with more than 50%, over such frights as heights and the dreaded public speaking.

The video of a rattlesnake strike below is enough to make your skin crawl. A fear of snakes is no reason to avoid the wilderness, though.

Relax. Here are some reassuring facts about snakebites.

  • Of all the snakes you might encounter in North America, about 10% of them are poisonous.
  • There are around 8,000 snakebites each year in the U.S., resulting in only about 8-15 deaths.
  • As long as a snakebite victim visits a modern medical facility quickly, survival rates are very high.
  • Snakes would much rather use their energy and venom on small varmints for food rather than on you just to be scary.

Relax. There are plenty of ways to avoid snakebites.

  • 50 to 70 percent of reptile bites managed by the Arizona Poison and Drug Information Center were provoked by the person who was bitten. Translation: If you don’t handle or bother a snake, odds are amazingly good that you won’t be bitten.
  • Deep grass, wood piles, and rock crevices are a snake’s favorite spots. Keeping your hands, feet, and faces out of those areas and your chances of survival increase drastically. If you must work or walk in these areas, wear sturdy ankle-high boots with tough pants or gaiters.
  • Walking around in the dark? Wear a headlamp, carry a flashlight, or stay in well-lit areas to avoid disturbing an innocent snake.
  • Snakes can still bite for a few hours after they die. If you see one smashed on the road, leave it there.
  • Remain relatively sober when camping and exploring the wilderness. Snakebites invariably happen to stumbling drunks who lack the coordination or brains to know when to leave well enough alone.

Relax. If you’re in the modern world, odds are good you’ll survive the bite.

  • According the the Poison and Drug Information Center at the University of Arizona (who know a thing or two about rattlers), your car keys are the most essential survival tool for a snakebite. After a bite, don’t mess around. Get in the car and get to a hospital.
  • Snakebite suction kits, tight tourniquets, and restrictive clothing all keep the venom concentrated in one area, and that’s bad. Loosen clothing, help the person to remain calm and still, and get medical attention.
  • Don’t bother trying to photograph, catch, or kill the offending snake. You’re just wasting time and increasing the odds of dealing with yet another snakebite victim. If you can remember it’s general appearance, that will help.
  • Get medical attention even if you’re totally 100% convinced that the snake was not poisonous. These bites can still cause nasty infections, pain, and there’s always the slim chance you could be totally 100% wrong.


The infamous gonzo journalist Hunter S. Thompson is famous for saying, “Luck is a very thin wire between survival and disaster, and not many people can keep their balance on it.” According to some recent research, luck is going to be the only thing that most Americans will have in the event of an emergency.

Left Stranded Without an Emergency Fund
USA Today recently reported that roughly one-third of Americans don’t have any emergency savings. That means that about 72 million people have no money set aside in the event of an emergency. One survey shows that 18 percent of Americans save nothing from their paycheck. (USA Today)

  • Start by putting away small amounts each month and watch your emergency fund grow.
  • Make a commitment to reach a certain amount and then go back to your regular spending.
  • Decide on the definition of “emergency” beforehand to keep yourself from slacking and using it for something that just seemed important at the time.


Hungry and Helpless Without Supplies and Resources 
The 2012 FEMA National Survey asked citizens about how much they’ve prepared for an emergency. Only 29 percent of people surveyed said they had current supplies (and could name three of them) stored in case of a disaster. The report also showed that only 23 percent had ever attended a meeting or training on how to be better prepared for a disaster. (FEMA)

  • Connecting with community emergency volunteers allows you to help others.
  • Your connections could give you an inside track to closed routes or medical resources when things get bad.
  • Keep supplies organized, clearly labeled, and monitor expiration dates.


If You Can’t Lend a Hand, Get Out of the Way
According to the American Heart Association, 70 percent of Americans may feel helpless to act during a cardiac emergency because they either do not know how to administer CPR or their training has significantly lapsed. (American Heart Association)

  • Sign up for a local first-aid and CPR class and get certified.
  • Take your skills home and run through a simulation to help get your friends and family familiar with proper procedures.
  • Put together a first-aid kit for any travels.
  • Being prepared to handle injuries makes you a valuable addition to your community.


The lack of knowledge among Americans about what it will take to survive a natural or man-made disaster is unsettling. Don’t wait until a terrible event before you notice that you could have been ready.


You can’t see them, but they’re there. Bacteria are lurking in wait to descend upon your intestines and blood, but the fight isn’t one-sided. Sure, they have the power to totally ruin your trip and your health, but a little preparation on your part goes a long way.

E.Coli Waits in the Water
Everyone from the casual hiker to the gnarly survivalist must know about drinking safe water. One (out of many) of the most common and dangerous bacteria found in contaminated water is E. Coli. This powerful bacteria punches well above its weight, causing severe diarrhea, abdominal pain, and sometimes kidney failure.

It’s best to just assume all water you encounter in the wilderness is contaminated by tiny nasties bent on your destruction. Keep your eyes and mouth closed when bathing or swimming in any questionable water, especially if it isn’t free-flowing.

When you’re out on your adventures, keep a record of where and when you gathered your water. When you find yourself at the doctor this will help to determine the course of treatment. It may help to notify authorities of contaminated water sources.

According to the Centers for Disease Control and Prevention, “If boiling water is not possible, a combination of filtration and chemical disinfection is the most effective pathogen reduction method in drinking water for backcountry or travel use.”

Stomach devastating Salmonella
Bacteria in food can not only ruin a fun outdoor adventure, it has the potential to cause deadly health problems.

Salmonella is a microscopic bacteria behind serious gastrointentianal infection known as salmonellosis. Ingesting this bacteria in under-cooked or contaminated foods can result in  cramps, headache, fever, vomiting, and severe diarrhea. Symptoms can wait to show themselves for 12-72 hours, so keep track of what you’ve eaten over the course of your trip. This will help with diagnosis if problems set in.

Take special steps to keep your utensils and hands clean. Wash dishes and hands with anti-bacterial soap before and after use. Cooking in the dark can pose hazards for under-cooked meats, so bring a small food thermometer to check food temperature before you dig in.

Lyme Disease Causing Borrelia burgdorferi
One of the most powerful backcountry bacteria, Borrelia burgdorferi, is carried by deer ticks. It causes Lyme disease, which affects thousands of outdoor enthusiasts ever year. When a tick is infected with the bacteria, it transmits it on through bites.

Immature ticks, called Nymphs, are the most responsible for passing along the disease. They are especially dangerous due to their size, less than 2mm. Outdoor explorers and ticks are most active at the same times,  the spring and summer months.

When you return from outdoor trips, give yourself a full body check for ticks. They like to hide out in dark places like armpits and the groin area. A bull’s eye rash is an early indicator of a tick bite, but other symptoms can include fever, headache, and muscle pain. If you see a tick or rash, grab your phone and take a photo. This way you can show your doctor to help determine spread and diagnosis.

They may be tiny, but you should treat bacteria in contaminated food, water, and insects like the towering behemoth of doom that they really are. Add cleaning products to your packing list and test out your backcountry recipes before you hit the trail.


Autumn Veatch, 16-year-old girl, was flying in a small 3 passenger plane when it crashed over the weekend in the Pacific Northwest. Her step-grandparents who were with her still haven’t been found, but she used survival skills to get out alive.

The plane left on July 11 from Montana but never made it to its’ final destination. They encountered bad weather and couldn’t avoid slamming into a mountain. After the crash, she stayed near the wreckage for a full day before bravely deciding to take her survival into her own hands

Covered in bruises and burns, she managed to hike for two full days in the dense and dangerous forests of Washington state and was eventually found by a motorist.

Amazingly, she had the presence of mind to follow a drainage creek to a river, eventually finding a nearby trail. She pushed herself without food or water on to an eventual trail head where she was spotted.

She’s been treated for minor injuries and dehydration, but has emerged from this heartbreaking tragedy alive.

The inspiring story of her survival serves as a reminder that staying prepared for desperate circumstances is always a good idea. Her fitness of mind and body played a crucial role in helping get out of dense forests and endure intense stress.

This is your body under pressure.
Hormones rocket like flaming ping pong balls all around your brain. Your breathing turns fast and erratic. Your heart pounds mercilessly but your blood vessels have constricted, choking off the flow of vital oxygen. Your muscles are at DEFCON 1. Maximum readiness.

There are two results that can come from pressure. It can be what inspires us to complete fantastic feats or it can make us falter under our own weight, dropping the ball when our performance means everything.

It can set in over a period of a few days or hours. Work slowly piles up. Orders build up in the kitchen of our minds, the dinner rush soon growing unstable and furious. Confusion leads to stress. Stress leads to panic. At the office, on a family camping trip, or in a small beach down with a tsunami bearing down on you, you must manage your stress levels or face the consequences.

Fearless first responders, flame singed chefs, and world famous elite athletes each have something to teach us all about how to stay calm when life cranks up the pressure.

1:Prioritize problems by working triage. 
The train smashed into a semi struck loaded with steel at 9:47pm. On that night in March of  1999, the citizens of Bourbonnais, Illinois experienced one of the biggest accidents in US history.  An Amtrak train collided with the truck that was blocking the crossing, resulting in 11 deaths and over 122 injuries.

When first responders arrive on the scene like this one, they’re overwhelmed with tasks almost instantaneously. All of a sudden, every move they make and every second they spend pondering a choice could mean the difference between the life or death of a total stranger. The situation is chaotic, filled with noise and disturbing scenes. From the very first moments, they use a system called START, or “simple triage and rapid treatment”.

They immediately begin organizing and evaluating victims based on their condition. They quickly and confidently place the injured into one of four categories: Immediate (red), Delayed (yellow), Walking Wounded/Minor (green), and Deceased/Expectant (black). Responders are instructed to follow practiced protocols and evaluate each victim in only a minute or two. They instruct anyone who can wait for delayed treatment to move away to a specific area, leaving those who need more urgent care identified and accessible.

First responders are well-trained and practice frequently for situations just like this. The START triage process requires confidence and education. But that doesn’t mean you can’t use something like it to manage yourself in your own stressful situations.

When you have a 10 car pileup of important tasks crashing in your brain, stop and work triage on the list. Move the tasks that can be delayed away from the tasks that need urgent attention. If the situation is confusing and uncomfortable, get a bead on what you do know and focus on that. Being able to discern the differences between what’s essential and what can wait can earn you precocious seconds when time is short.

2:Stay organized to avoid confusion.
Keeping your various projects organized can help you stay calm while others are in the weeds.  Unpredictability ramps up stress and pressure to unmanageable levels. Staying organized keeps life predictable, and that can do wonders for scaling down the stress.

Popular restaurants are able to keep large rushes of customers happy and full with a kitchen crew that is fast and, above all, meticulously organized. By staying organized, chefs and cooks handle the stress and chaos of flying orders while wielding razor sharp knives and flaming hot pans.

By dividing up the work into organized stations, successful kitchens manage to handle thousands of meals every week. A trained cook at the saute, grill, fry, and salad stations can field hundreds of orders each night with the confidence that the others are also doing their part. The stations are organized to work together and create a finalized order that would be impossible for only one cook to prepare.

How does a restaurant kitchen relate to your survival? In more ways than you think, it turns out.

Clutter and chaos is hazardous to your health. Research shows that people who are surrounded by clutter and unfinished projects have increased depression and stress levels. These affect your sleep, your eating  habits, and ultimately your ability to handle tasks effectively. Unorganized people often feel ashamed of the appearance their office or home, and in turn may avoid more investing in deeper relationships.

Keep your supplies and gear in the same easily accessible location for quick access. Divide complex projects up into more manageable sections and assign tasks to others based on their skills. Fight against the negative effects of unpredictable situations by planning well. Look ahead and learn about what supplies or skills you may need well in advance.

3:Make pressure work for you.
Pressure has a negative effect on just about every part of our movement and our ability to plan and solve problems. Stress hurts our bodies and inhibits our success. It would all seem to result in pressure causing worse performance, not better. But you can take the pressure and turn it around. You can actually make high stakes moments work for you, not against you.

How? Looking at athletes who consistently perform at high levels can illustrate just how it can work.

For elite athletes, exceedingly high expectations and a fear of failure can pile up and drastically inhibit performance. It’s vital that they learn to block out the millions of eyes that they know are watching their every move and act on instinct and training. How do they move past fans’ expectations of near flawless play night after night, often under punishing physical circumstances? They fail. And they do it frequently.

They’ve learned to make pressure work for them by understanding the inevitability of mistakes. They, very unlike their fans, understand their limits and accept imperfections. They expect success and work insanely hard to achieve it, but they know that on any night they may win or they may lose. The outcome of the contest may even rest upon their shoulders and they could very well fumble the opportunity. All they can do is put in every single ounce of effort they can muster and hope that they are in a place that makes success inevitable.

Don’t let a fear of mistakes and missteps stop you from doing your absolute best to handle a high pressure situation. Every hand is needed in a crisis. Emergencies don’t wait to happen to people who are prepared, they happen to anyone and everyone regardless of ability and preparation. No, you may not execute every task with perfect skill, but you fearlessly did your best to make the situation better. An that’s what counts in the end.

You can’t avoid pressure. You can’t live a life with no stress. The best you can do is prepare. Learning what it takes to lead, study what it takes to handle yourself in the face of chaos, and practice what it takes to survive.


It’s the seemingly small skills that can mean the difference between surviving and thriving. They’re easy to master and cheap to practice. The summer is a great time to spend some time outside working on some manual skills that we should all at least have some idea how to do. We’ve chosen some basic skills that don’t take too much time or money to practice and that can be done in a small backyard. They’re perfect for including your family and friends and are fun ways to be active outdoors.

1.Stack Firewood
Whether grown at home or purchased, stacking firewood is the best way to ensure that it’s dry and efficient to burn. Dry wood burns best, so the key to a quality stack is exposing the ends of each piece so that the sun and breezes can dry it out over six months or so. If you can, use the Hammock method and stack between two trees about 15 feet apart and use them as end posts. If such trees aren’t available, you can support the ends of the pile with anything stable, such as a fence post.

The style of your stack is your individual choice as long as you don’t stack too tightly, allowing space for air to circulate through the pile. Alternating your pieces in a north-south then east-west fashion can increase stability and air flow. Use pallets, cement blocks, or stones to keep the wood up off of the ground and any moisture that accumulates.

Stack the wood with some irregularities and split logs in certain spots to avoid any long vertical seams that can make the pile unsteady. Protect against rain by overlapping split pieces along the top with the bark side up like roof shingles or by covering with a tarp. Just be sure that the stack stays open to let air and heat circulate. Don’t forget the need for quarter-split logs and kindling, which can be kept nearby.

What You’ll Need: a purchased or self-cut cord (128 cubic feet of wood that ends up as a stack 4ft. high, 8ft. long, and 4ft. deep) of wood, gardening gloves, a location that gets sun and breezes, dark colored tarp (optional).

2.Build a Campfire
There are many ways to build a campfire, but the one you should practice making is a Log Cabin style campfire. It’s easy to build, stable, and very hot. Start by creating a clean and clear circle in which to build your fire. Either dig a small pit about 6-8 inches deep if the ground is soft enough or create a ring of large stones. Be sure that the area is clear and far away any danger of starting unintended fires.

The key to a Log Cabin style campfire is a strong and hot core with plenty of fuel. The dry and organized wood from your stack that’s been seasoning all summer long will work nicely. Assemble a nice amount of kindling material. Soft and dry grasses and leaves that catch fire quickly will form the bottom layer and pencil thin sticks that snap easily will be the kindling level.

Start with a flat and dry spot on the ground. Dig a small ditch about one inch deep in the soil. This will hold an initial bundle of kindling and will be at the center of your Log Cabin structure. Around your small ditch place three wrist-sized pieces of wood, leaving the open end facing away from any breeze. keep this small ditch accessible at all times as you build the structure, since you’ll ignite the fire by placing a bundle of kindling (or match, lighter, or fire-starter) in the trench.

Build your structure up by alternating perpendicular logs on one level and small dry kindling above it. This ensures that the core of the structure burns nice and hot right from the start. Any larger wood pieces should be on the outside of each perpendicular level to keep the structure stable. Each layer should be made up of pieces and kindling slightly larger than the last. Ignite your structure through the trench at the base and each level will catch the next above it, resulting in a hot and stable campfire.

What You’ll Need: 15-20 dry pieces of wrist-sized wood, plenty of pencil-sized and dry kindling material, and a clear and dry place to build a fire.

3.Cook a Fish on Hot Coals
As your campfire dies down you’ll be left with a glowing bed of hot coals. After some practice you’ll be able to manipulate a bed of coals to create delicious meals equal to anything you could cook up on a grill or stove-top. To start, use a longer piece of wood to arrange the coals into a flat surface. When the coals are glowing red and you can’t hold your hand over them for more than a few seconds, they’re hot enough to cook on.

For adventure’s sake, head to the grocery store and choose a whole fish with the head, tail, and scales still intact. A trout or red snapper is an excellent choice. A fully thawed fish will cook best. Unless it’s a freshly caught fish, the cleaning has been done for you. If you’ve been keeping a small herb garden this is the perfect chance to use them by stuffing the inside of the fish with herbs and slices of lemon or any fruit for flavor.

You can place your fish in a nice bed of aluminum foil, but if you’re more adventurous and actually prepping for a time when no foil is handy, use large moistened leaves such as banana or oak to wrap up your fish. Secure the little package with moistened twine. Just be sure you’re using a leaf that’s safe to cook with. In the case of fish, you can place the fish directly on the coals without any foil or leaves, but it will take practice to cook it with minimal ash or dirt getting on the meat.

After 6 or so minutes on each side, your fish should be ready. Depending on the size of the fish and the heat, it may take longer. Double check that you can easily pierce the skin with a knife or fork and that the meat is firm and flakes away easily. Let your fish cool a little and then pick it apart, keeping watch for any bones.

What You’ll Need: A flat and hot bed of coals, sturdy aluminum foil or large edible leaves and twine for wrapping, freshly caught or fully thawed fish

Now that the weather is warm get outside and start experimenting with these skills. Prepping doesn’t have to be all doom and gloom. Practicing these skills is a great way to get your family and friends involved and make practical survival skills into regular events.