I got lucky enough to acquire a full set of different size cast iron cookware from an ex-roommate nearly 25 years ago. He didn’t want to take them with him and I couldn’t bear to see anyone else get them. Even though I’ve moved multiple times since then, I’ve never even considered not keeping them. There were times when I didn’t always take the best care of them though, and I’ve had to reseason them a few times.

I also occasionally see perfectly useful cast iron cookware at yard sales or thrift stores and they can be intimidating if you don’t know how to reseason them, but it’s not that hard. Here’s a run-down of how to do it.

First, sand off the rust with steel wool or rough sandpaper or a steel brush. Use whatever is efficient to get off the rust without digging into the iron too much.

Oftentimes, a cast iron pan that has been neglected will have a thick coating of black carbon on it. This often means that something burned in it and the person didn’t know how to remove that or didn’t bother to. In this case, it can be burned off by putting the pan in a hot oven. Use the self-cleaning cycle of the oven if it has one. If not, turn on your exhaust fan and keep an eye on it so nothing catches on fire. Spraying it with oven cleaner and letting it sit, then scraping off the carbon also can work.

Once it’s clean, wash it with soap and water and dry it thoroughly. Once it’s seasoned you’ll never use soap on a cast iron pan! A well-seasoned pan allows the oils and fats from cooking to bond with it. You want this smooth surface to grow over time, and using soap erodes that.

Take your clean pan and place a blob of shortening in it. How much you use will depend on the size of the pan or pot. For a teapot or something like that, use quite a bit. You want this to melt and cover the entire surface. Place a clean pan underneath the cast iron item to catch any drips of shortening so you don’t start an oven fire. If it’s an especially deep pan and you can’t coat the entire surface, rub some shortening on the surfaces. Take the pan out of the hot oven once in a while and CAREFULLY rotate the pan so the melted shortening adheres to the sides.

This is like basting a turkey…cover up all the surfaces so it soaks in and coats everywhere. Leave the pan in the hot oven for an hour or so. Make sure all surfaces have absorbed as much oil as possible. Then leave it to cool. If it looks black but not shiny, consider repeating the oven process above a time or two more. The first time you cook with it, run some cooking oil over all of your surfaces.

When cooking with a cast iron pan, don’t overheat, because burning your food will destroy this seasoning you’ve worked so hard to create. Use oil or butter when you cook and avoid cooking tomatoes or other acidic foods, because that can erode the seasoning surface. Avoid cooking something that boils a long time in a cast iron pan, because that too can erode the surface. You can cook tomatoes or cook soup in a cast iron pan, but you should wait until the seasoning surface is well-developed.

Once you’re done cooking with it, clean it out right away so nothing sticks to it. It shouldn’t stick hard, but cleaning it promptly under running with a gentle scraping from a rubber spatula should be enough to dislodge your cooked-on food. Avoid soap, because it will wash away the seasoning surface you’ve worked so hard to create.

The first few times you cook with it after seasoning, you want to encourage a good seasoning surface to develop. Cook oily foods for the first 5 to 10 times. Good choices would be fried chicken, pancakes, fried potatoes, grilled cheese sandwiches, pork chops with fried apples, etc. The more you cook with it, the more your smooth, non-stick surface will develop. If you don’t cook with it often, rub the surfaces with oil in between use.

Once you get that season on the surface, if cared for your cast iron pan will last forever. Occasionally the less high-quality pieces will crack or break. But avoid putting a hot pan in cold water, avoid dropping it, and take general good care of it and that should not be a problem.

We all love to cook on the grill when it’s nice out. But what if you had no electricity for your stove and you had to find some other way to cook? There are numerous different stove types and they have advantages and disadvantages.

Open fire – This assumes that you have dry fuel, fire starting material and that you know how to build a basic fire. Also, this is not the best method for cooking if it’s raining or freezing cold.

Grills – You likely have an extra bag of charcoal laying around. If not, consider getting one. Also, you can cook in a charcoal grill just like you would in a campfire if you have the dry fuel. If all you have is a propane grill, just make sure you’ve always got back-up fuel. Again, this is not the best method for cooking if it’s raining or freezing cold.

Camp Stoves – You probably have a couple of different types of cook stoves in your bug out gear. I do. I have an alcohol gas stove with some extra cans of gas. I have a Jetboil (which works great for heating up water quickly). I have a small biofuel stove that doesn’t require any fuel other than some dry tinder and a match. I also have a fuel tab stove. I also have I wish I had purchased the Biolite Stove, because it can charge up a phone or light through a USB port on the side while it heats up your food. That may be one of my next purchases. I also have my family’s old two-burner suitcase style Coleman propane stove. The problem with all of these except the biofuel stove is that you have to have gas or fuel of some sort or it is useless. That’s always the drawback.

Biofuel Stoves – I recommend that everyone have at least a small version of a biofuel stove. These burn nothing but pinecones, twigs and small sticks and such. As long as you have a match of some sort, there’s no need for fuel tabs or gas cans. I go around my house in the summer and gather up fuel and put it in a small container, so I know I always have dry kindling. My stove is small and can’t cook much more than a couple cups at a time, but it will work and it will provide food and keep me alive. If you really want to make an investment there are huge biofuel stoves than can hold a paella pan and even transfer the heat to heat your house! Maybe someday I’ll have something like that.

Fuel Tab Stoves – These are typically small, lightweight stoves that burn a fuel tablet. Often, the stove frames fold up. One tablet will bring up 16 ounces of water to a boil and they burn pretty hot and clean. If you have the fuel tabs but not the stove itself, other small cans or containers can be used to transmit the heat. these also need more of a heat source to get burning than what you might get from a striker rod . . . they’re just harder to catch.

Alcohol Stoves – I’ve never used an alcohol stove, but I hear they are a little harder to get going than these other types. What say you who are more experienced?

Solar Oven – While I’d love to go this route for myself, I live where the sun shines only 3 or 4 months out of the year! I’d never be able to survive if I had to rely on a solar cooker during the winter in the Pacific Northwest.

So with that outline, what do you think is the best stove type for a SHTF situation? Why?

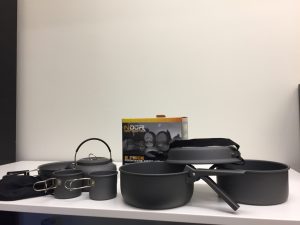
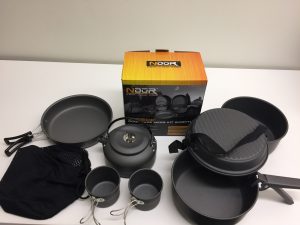
We were shipped the NDUR 9-Piece Cookware Mess Kit with Kettle, distributed exclusively through Proforce Equipment, and intended to take it camping. We didn’t get to take it on a trip but we did put it to the test cooking all of our meals at home over the course of a weekend in it, as if we were camping. The result? We liked this kit and can feel comfortable recommending it for a backpacking kit, camping kit, bug-out bag or emergency at home cooking kit.

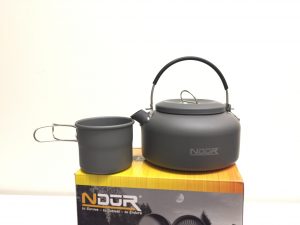
The only thing that keeps me from stopping short of saying that this is a “survival kit” is the tea kettle. I personally loved the tea kettle and the two cups it came with, but if I really am in a survival situation, having a cute little teapot with a lid and two little cups won’t matter much. The company also makes a 6-piece cookware essentials kit that doesn’t include the tea kettle and cups which might be more of a bug-out cooking kit than this one is.

The NDuR 9 piece cookware mess kit is made of hard anodized aluminum. The descriptions says it is easy to clean and I found that to be true. I cooked eggs in it for my breakfast both mornings, including a sunny side up egg that I flipped with a spatula as well as scrambled eggs that I scrambled in the pan. I used a little oil in the cooking and while some of the eggs stuck, it did clean up very easily. The handles get hot in normal use on a burner, so I imagine that if these were used over a fire the handles would get burnt up pretty quickly. The webpage does say to keep the handles out of the path of direct flame, but if you’re trying to cook over an open fire I imagine that would be hard to do. It does come with a gripper that can be easily hooked on to the side of any of the pots or cups to protect your hands from heat. everything except the drying pan/plate/lid comes with handles that fold away.img_3405

One thing I cooked was a combination of brown sugar and butter to make a desert. I stirred the butter and sugar with a fork, and I expected the fork to scratch the surface of the pot but it didn’t. After the butter and sugar cools off, it became a hard sticky lump. I expected this to be difficult to clean off, but it wasn’t. I had to scrub a little bit but this did not mar the surface in any way. I typically do not like drinking out of metal cups because of the heat transfer, and these did get hot, but they are made of the same easy clean material as the rest of the kit so I feel good about their durability.

img_3410

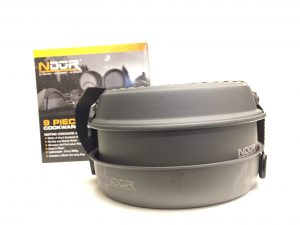
The food in the pots did seem to heat up quickly. I warmed up water for coffee and soup for lunch. I made a grilled cheese sandwich and it heated up evenly and quickly. That’s a key part of cooking on these…the heat does go through quickly so it’s not cookware that you can leave unattended. One nice thing about it is that everything nests inside of itself. When combined together, the pots have a strap that holds them together and they also easily slide inside a mesh bag. The tea kettle does not nest all the way inside the pots but the strap keeps everything from being wobbly. If you really wanted this to be a survival kit, simply remove the tea pot and that would give you other space inside the inner pot where you could stuff some other gear. I hate to tell you to leave out the tea pot though, as that was the nicest part of the whole kit. But when we’re talking about survival, the creature comforts will quickly go by the wayside.

The large pot holds 1.8 liters. The smaller pot holds 1.4 liters. The large frying pan is 7.5 inches and the smaller frying pan, which doubles as a plate, is also 7.5 inches. The kettle holds .8 liters and the two cups hold 5 ounces each. The gripper can be used on all pots, pans and cups. Altogether, the kit weighs 31 ounces and when nested together fits into a space only 7.6 x 5 inches. I also liked that the handles on the kettle and on the kettle lid were sturdy and remained upright without flopping over.

The kit retails on Proforce Equipment’s website for $69.00.