Many preppers who aren’t “gun people” have a gun or two for home protection or for the inevitable time when the SHTF. We have one in our home. To be honest, though, I haven’t gotten it out nearly enough.
The shotgun is a good choice for home defense. Why? It’s powerful, easy to operate, and the sound of a shell going into a chamber will put fear into the hearts of most anybody. They can be used against people and animals pretty equally. The different loads of ammunition make it possible to take game from very small squirrels to a large deer. Knowing this is a good part of making your shotgun most useful in a survival situation. Of course, it also helps to have a variety of ammunition types on hand.
For example, if you’re after quail, you want a shotgun load that’s going to give a lighter, wider load pattern. A squirrel or a duck on the wing needs a tighter load pattern. A large target (a man or a bear) demands a load pattern that is going to be tight and hit with more force.
Birdshot uses very small pellets and is so named because it’s useful for hunting birds. The size of the shot is given as a number or letter–with the larger number the smaller the shot size. Buckshot uses medium to large pellets. A slug is a single projectile. To use this, it must be aimed very carefully from fairly close range.
Buckshot is generally the best for home defense, because its larger size shot (pellets) is going to pack a more painful punch and be more effective against larger targets.
Whatever type of shotgun you have, practice just as you would with a handgun. Because the gun is larger and likely needs to be aimed more carefully, practice with a shotgun for hunting and self-defense is equally as important as for a handgun. Make sure you know how to load and manipulate the gun quickly, in low light, and at close range. Otherwise, what’s the point?
No matter how much gear you have in your pack or bug-out bag, if you don’t know how to use them or have some basic survival skills, you’re not going to last very long. These are the top 5 skills you must have if you’re going to survive TEOTWAWKI or a SHTF social breakdown situation of any kind.
1. Find and Purify Water
There are a number of ways to do this. We’ve written about “collecting water in the desert” as well as “building a better rainwater harvest system, ” so click around on this site for ideas. You must have some sort of purifier like a Lifestraw, or know how to collect water through condensation. Even in the desert there is some amount of water in the air. I’m lucky enough to live in a place with an abundance of water, so to be honest I’ve never actually tried any of the water-collecting methods I talked about in that first article, but I’m inspired to try them now. Look for an upcoming column about how some of these methods actually work.
2. Start a Fire
Another topic we’ve written about before…Click around for articles like “testing petroleum soaked cotton balls for firestarters” and “firestarter options and backups.” I personally have a small biofuel stove at home, which efficiently burns sticks, twigs, pinecones and stuff. I have a 2-quart plastic container in my utility room full of stuff that I picked up off the ground in mid-summer . . . twigs, moss, fir cones, pine needles and other things that are bone dry and will readily burn. I have a packet of char cloth (both purchased and home-made), I have a fire piston (which utilizes only char cloth to make a spark), a magnesium scraper, matches, lighters, and a magnifying glass. Someday I’ll learn how to make a fire with sticks. Seriously, making a fire and having dry tinder is crucial. Have many options for fire starting available to you.
3. Build a Shelter
Depending on the geographical area where you are, the materials and techniques you use to create a shelter will be wildly different. In my part of the country, I would use the teepee approach by cutting down saplings and lashing them together. Then I’d take any tarps I had and use that as a covering and enhance that with branches. It would be tough to make it sturdy when one of our windstorms kicked in, which is why it’s so important to have some tools and rope available. I found this video that I thought had a good example that anyone could do provided they had a tarp:
4. Find Food
I’ve invested in a few books about identifying and using wold foods and you should too. I’m familiar with what grows around me and I keep an eye out for what foods are in my area. I know where the nearest stand of cattails is from my house and I no longer pull the cleavers out of my yard now that I know they are edible. Take a course on “how to eat acorns” like I did, and get either books specific to the wild food that is available in your area or learn from a skilled forager.
5. Basic First Aid
Everything I mentioned before will keep you alive, but it won’t help you if you get an infection (because there’s no soap or hand sanitizer) or you gash your leg and bleed out. We’ve reviewed the book “Bushcraft First Aid” and that’s a good start. Have some basic supplies in your kit and know what to do in a variety of situations. Just taking a basic first aid course through the local Red Cross would be a good start.
I’ve long known that you could eat acorns. I just didn’t know how. I knew that Native Americans relied on acorns as a food source and that they somehow had a way to turn them into flour for little cakes.
I live in an area that has some oak trees, and eventually I became curious about how to actually utilize this resource. As you may know, there are numerous YouTube videos and chapters in books and website pages about processing acorns. The problem is, though, that once I started looking around, I found so much information I didn’t know what was reliable. There are many different ways that you can process acorns to make them edible. I wanted to know what really worked.
The resources I had also didn’t answer some basic questions such as whether it matters if the acorns are green or brown. One of the trees near me had acorns all over the ground, but they were all green. Does it matter if they have their caps on or not? I saw one resource on using acorns as a survival food that said acorn flour needed to be stored in the refrigerator or freezer. How will needing to keep the flour cold help me if I’m in a survival situation?
So when I saw that a group near me was offering a workshop on acorn processing, I immediately signed up. I was one of 10 students who spent most of a day with an instructor from a school of botanical studies (they teach herbalism and wild plant foods). We walked around an area with a lot of oak trees, learned to identify the different native species we have in my area (Oregon), and what the trees’ growth patterns can tell us about the environment. Regardless of what type of trees you have around you, all varieties of acorns are edible!
It’s fine to read books and watch videos, but if you have a chance to learn from a real instructor in person, that is highly preferable. You can ask questions, see, hear, smell and taste in a way that you never can by watching a video, no matter how detailed the instruction. Here’s what I learned about using acorns as a survival food. And to be honest, the acorn “mush” turned out so good that you might want to eat it all the time.
Our group walked around to learn how the trees grow. We learned that Douglas firs and other fast-growing trees compete with oaks for light, and if an oak doesn’t get enough sun over time it will die. Knowing what trees you might need to remove can help you manage oak trees if you want to make sure that the trees in your area stay healthy and keep producing. We also learned that oaks have some years where they just don’t produce much, and some years, called “mast” years, where the nuts are abundant.
Our instructor also reinforced the fact that native people had collected acorns from right where we were walking for thousands of years. It was a great feeling to know that we were learning how to keep this craft alive and that we were learning how to truly eat food on a local level.
After we walked around and talked, we collected our nuts. We learned to avoid acorns that still had their caps on. We picked up only brown acorns, avoided ones that had a hole in them which was due to an acorn weevil (more on that delicious little protein morsel later!) and we avoided ones that were cracked.
Then we got to work processing them. Our instructor let us spend a few minutes cracking fresh acorns before telling us that it would never work to turn fresh nuts into flour! So that’s survival lesson number one…if you want to use acorns as a survival food, plan ahead. They must be dried before you can pound them into flour. You can let them naturally dry over months, you can use an oven, or a dehydrator, or put them by a wood stove. But either way they can’t be used right when you collect them off the ground.
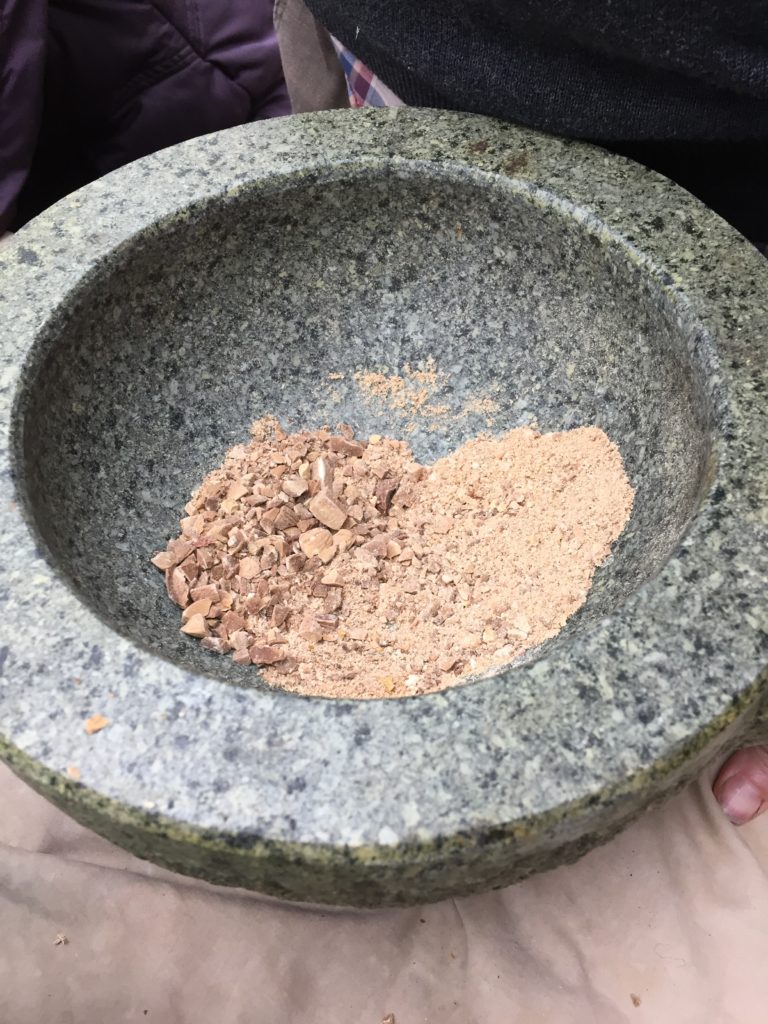
Here are some photos of the dried nuts she had pre-dried for us to use.
As you can see, the whole nuts that you use should be free of mold and yellow or green discoloration. The variation in color is ok as long as they are “clean” looking.
It takes about 20 minutes to pound about 1/2 cup of the nuts into flour using a mortar and pestle. If you use this method, pound, don’t grind. If you grind, you’ll release the oils, which will make it turn into nut butter. Maybe that’s what you want, but in this case we were going for finely ground flour.
If you have a meat grinder, that’s a much faster way to process the acorns. You’ll get some fine flour and some “chips” or “grits” size pieces. Those can be sifted out and finely ground by hand or cooked in a soup. You can also use a grain mill or some other technology if you have it available.
After you start processing your nuts, you’ll sooner or later find one of these acorn weevils. Go ahead and eat it! The little protein morsel tastes like nuts. It’s slightly sweet, and only a tiny bit chewy along the edges. If no one else in your group is willing to eat them, then good, that’s more protein for you. I ate one, and I lived to tell the tale.
After you collect the flour, it’s time to leach the tannins out of the nuts. The tannins are what make them bitter and you want to remove the tannins before you eat the nuts. There are many ways this can be done. One thing I was surprised to learn is that if you try to leach whole nuts (in the shell) it can take months. One person in the class had a brilliant idea of putting a bag of whole acorns into their toilet tank, so they were constantly being “flushed” through with fresh water. You can soak them in a large bucket. This takes months. Longer than you think. But the acorns are fine in the water for a long time. It’s better to store the whole nuts and process them into flour when you’re ready to use them rather than trying to store the flour. The flour won’t stay fresh for very long without freezing or refrigeration.
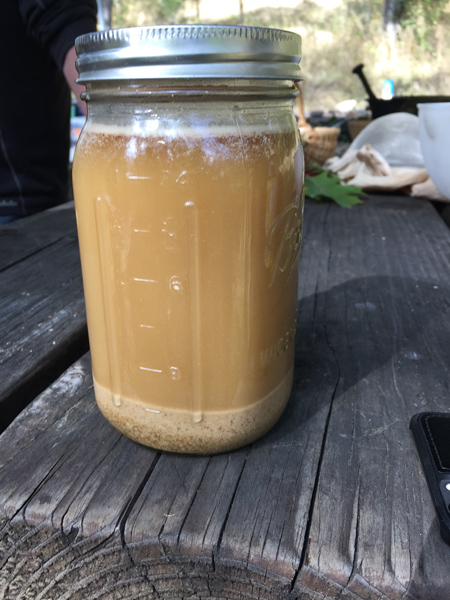
The smaller the acorn pieces, the faster they leach. We leached them in two methods…the first was to put the finely ground flour into a jar filled with hot water (photo 1 below). This could take about a week. You can taste it, and when the nut meal tastes good to you, you can use them. Replace the water when it turns brown. If you have the option, place the jar in a refrigerator because if it is hot out it can begin to ferment.
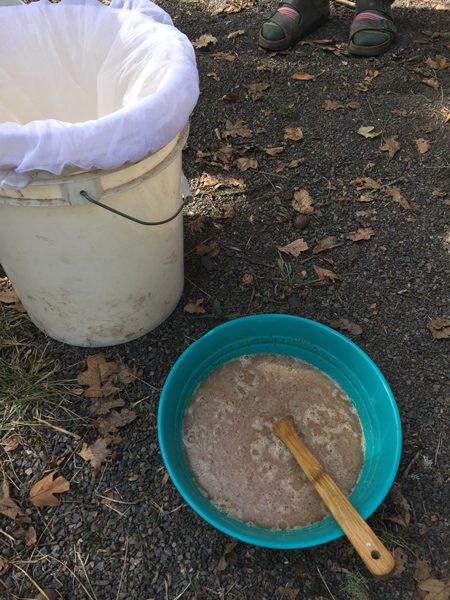
The second way was to put the flour into a bowl, pour water over it to cover and stir, then pour the whole thing through a mesh bag that you can get at a homebrew store (photo 2 below). Pour more water over the flour until it tastes good. You can “hot leach” the acorns by simmering them over a flame or on a woodstove. It can take over a day to leach whole nuts this way.
Photo 1
Photo 2
Our instructor had some already leached flour that we cooked with a little water into “mush.” One cup of flour will expand to about 3 cups of “mush.” The taste was good. It was nutty, but bland. The flavor really woke up when I put some salt on it. If you have any toppings like butter, onions, or salt and pepper, that would make the mush taste much better. But even with no flavorings at all, it was edible and even good, just bland.
Our instructor also had some already-prepared chili that she had made using whole acorns cooked in place of beans. The other ingredients were the same as what you would normally put into chili. The flavor of the chili was great, it was just odd because the nuts oxidized and turned the whole jar of chili a dark, inky black color. If you just focus on the taste and not the color, that too was good! The flour could be made into bread or pasta just as you would use any other flour.
One caution I have is that people can apparently be sensitive to acorns. My partner is allergic to pecans and walnuts, and when he ate the mush, he said it made his tongue feel fuzzy the same way that other nuts do that he can’t eat. So he’s not into using acorns as a survival food because of this. If anyone in your family does have a tree nut sensitivity, you might test it out and see if they can safely eat acorns before you plan for that to be a source of sustenance.
Cooking the acorn mush.
Bottom line…I will collect acorns now whenever I have a chance to. Do your research, read your books and watch your videos. But if you get a chance to learn from an expert, do it. It’s the best way to really master a survival skill.
We recently learned that a Texas woman got stranded in a remote part of Arizona after she ran out of gas during a solo trip to the Grand Canyon. We didn’t hear about this case until after the show about this woman’s rescue aired on 20/20 in March. But it is an interesting example of many survival scenarios coming together along with something we’ve written about before . . . surviving in the desert. (Read: Seven Rules of Desert Survival). How did this young woman do? Let’s check it out.
Amber VanHecke is 24 years old and was stranded for five days. When I was 24 I would have had no idea how to survive, having given emergency preparation zero thought back then, so she probably automatically did better than I would have at her age. A mishap with Google Maps caused her to go way off track in the Havasupai Reservation and consequently she ran out of gas. You can watch a short, minute-long video of her 20/20 appearance on this Dallas News.com page.
WHAT SHE DID RIGHT:
She prepared for the possibility of being stranded. She had extra food and water with her, including high energy foods like almonds, pumpkin seeds, Goldfish and dried fruit. And she ate only enough to keep from starving. She said her stash of food could have lasted her 18 days. She cooked ramen noodles by leaving them on the dashboard of the car.
She built a HELP sign out of rocks. She noticed that planes occasionally flew overhead. I’m not sure whether her sign was large enough to be visible from the planes, but it couldn’t have hurt.
She parked her car by a man-made structure. This increased the chances that someone would come by the structure, and it provided some shade. Unfortunately, though, this structure blocked the view of her car by the one truck that drove by.
She left a note in her vehicle explaining where she had gone when she left the car. She left the vehicle and hiked an estimated 11 miles to make a 911 call. The call dropped before her location could be pinpointed, but rescuers were able to zero in on an area where they started looking. They found her car, but it was empty. They went down the road the note indicated and found her.
WHAT SHE DID WRONG:
She turned onto a road that didn’t exist. People are leaving nasty comments online about this decision and we admit that this as not a smart choice. After going so far on the initial Google Maps directions and then finding out that there was not a road where it was telling her to turn, that should have been her warning that she was not in the right place. The post she put on her Facebook page about the incident says that she thought the road may have washed away, so she turned anyway thinking she would encounter the road shortly. Instead, she came to a fence with no road in sight. At this point she had also lost her GPS.She backtracked then and found the road she was supposed to be on, but by then was out of gas. If your directions are telling you to turn and there’s no road where it’s telling you to turn, take this as a sign that you are doing something wrong.
WHAT YOU SHOULD DO:
Approximately 80 percent of people who get lost are day hikers who did not plan for emergency situations.
Before you go out on a trip, tell someone your planned route. If you get off course like this, chances are you will be in an area close enough to your planned route that someone will have some idea of where to look for you.
If you’re in the desert, or truly, anywhere where there is harsh summer weather, always take extra water. You can’t survive without water and you may use all of your physical reserves looking for it.
Carry an emergency blanket. In the desert, temperatures drop wildly at night and rise high during the day.
Bring sunscreen and protective clothing such as hats and long sleeves.
Bring something to signal with, like a mirror, whistle or something brightly colored.
Carry a first-aid kit with basic supplies.
Rest. Conserve your energy as much as you can.
Keep a positive mental attitude. Keep something in your pack or car, like a deck of cards at a minimum, that can help you pass some time.
Keep a notebook and pen in your car so you can leave notes, as Amber did.
Image from Associated Press showing the positioning of Amber Van Hecke’s car by the silo and her HELP sign made of rocks.
I recently wrote a review of the first Ron Hood video I had ever watched. It was called “Advanced Survival Guide” and you can read that review here. I got three of his videos while I was at SHOT Show this past January and this is the second of the three reviews I have planned.
This one is called “The Ultimate Survival Guide” and it covers survival in cold climates and very hot, dry climates, as well as hot to do things we all got to do like poop. And in the case of women, deal with that time of the month. That’s what’s covered in the “Taboo Topics” chapter of this, and Karen Hood covers this tidbit of information for women, as would be expected. If you have a lot of survival guides you may have heard of a lot of this information before. But a big part of the fun of watching a Ron Hood video is the presentation. He really has fun with it and presents the basic information in an easy to remember way, so it will not be something you really have to think a great deal about if you’re trying to remember it in a time of emergency.
For instance, the part about pooping in the woods…I watched this with my 9-year-old son and he was cracking up at all of the different ways that Ron found to say “poop.” For instance, “When you have to leave some trail timber…” Yes, Ron probably used euphemisms more times than he really needed to, because you knew exactly what he was talking about, but that was part of the fun. There’s a review of this video on Amazon that says it’s “a bit crass,” and I have to say I did not find it crass at all. I also really appreciated his attitude about people who poop in popular camping spots. He was right on in his advice to not poop in the first flat spot you come to, because that’s likely where someone is going to want to put a tent there. I wanted to see more of Karen, but she only had a couple of bit parts, talking about some women’s issues.
He started out the video with survival basics, talking about how many calories you need just to keep yourself alive. His advice, based on the amount of calories in say, beef, versus wild foods like a squirrel, which he gives, reveal that it is better to use your energy (burn your calories) making shelter than being out in the cold shivering.
He showed how to easily make a belt out of paracord, so you always have that on your body. That’s a quick and easy project that now my son wants to do. The inside of the paracord could come in handy if you follow Ron’s advice to make a bone fish hook. I appreciated that he showed how the process of carving and chipping away at the fragment of bone was actually done. He even showed that it doesn’t work exactly right all the time if it doesn’t break in the place where you want it to, but you can still fashion something useful.
There was a useful section about things to have in your car, which includes some items that did not make my recent post called “Assembling a Car Emergency Kit.” He recommends a shovel and tow chain and good gloves, which I agree is essential if you are driving in snow.
The desert survival section covered collecting water. He demonstrated that the technique of digging a hole and covering it with clear plastic that I wrote about in the how to collect water post doesn’t really work! By far the most water that he collected came from the technique of using the plant’s transpiration. And now I know the truth about how useful cactuses in the desert really are.
Remember, this is a survival guide covering basics. He goes through what to do if someone has heat exhaustion and heat stroke. How to wrap a blanket around yourself for the most coverage. And, perhaps most importantly, what to do when you have to cut some trail timber. Al told, another recommended video. I’d say, particularly if you are a visual learner, and you want demonstrations rather than reading about something in a book, or if you have a grandchild who wants to learn DIY things. It doesn’t matter how old you are, if you’re new to “prepping” or you’re interested in survival, you can’t go wrong.
I’ve known about Ron Hood and his survival videos for a while. But I have to tell the truth…I had never watched any of the videos! While I was at SHOT Show earlier this year in January I got to meet the people behind the production company, Stoney-Wolf Productions. I even got to say a quick hello to his wife, Karen Hood, his widow who is carrying on the survival training since his passing in 2011. After watching the “Advanced Survival Guide” video, I was really sad that he was no longer around to make more videos.
I felt like I was in one of his training classes along with him. I really enjoyed his approach of both funny with practical information. I have a 10-year-old son who is big on watching survival videos on YouTube. He watches about 5 different channels religiously and to be honest, I felt that I wasn’t going to learn anything new in this Ron Hood video. It was filmed in 2009, and I wasn’t sure my son would stay interested and get anything out of it.
Let me tell you, not only did he get something out of it, he stayed glued to the television the entire two hour length of the video! I was amazed. In fact, me, my husband and my son watched the videos together and we felt like we were watching a thriller and we should have had some popcorn with it. We all enjoyed it. My husband, who hadn’t watched any Hood videos before either, said, “He’s knowledgeable, approachable and the information is still very relevant.” My husband and son got ideas for projects they can make together (Apache throwing stars!) and we all will never look at a tent pole and empty shotgun shells again (use them to make an impromptu hunting bow).
Hood even eats a slug at the start of the video! I already knew that cattails were edible, but Ron told me new things about cattails that I didn’t know, such as using the fluff as insulation, and making cordage out of the leaves and arrows out of the stalks. He also tells how to make a pocket for a handmade sling.
This video is divided into two parts. The first part is the Advanced Wilderness Survival Skills (Primitive Weapons, Tracking Basics, and the second part is Urban Survival Skills. That section was slightly less interesting, but still had some useful information on how to handle things around your home in the event of a social breakdown. Most other survival sites don’t really talk about what to do with our waste…urine and feces…but Hood approaches the topic of “deletion” with practicality and humor in a way that seems like it will work…as long as you have plenty of trash bags around!
He walks through how to get water from a hot water heater. It’s more involved than simply opening up the drain at the bottom. And to tell you the truth, we’ve lived in our house now for 5 years and it never occurred to me to clean out the hot water heater the way he suggests that we do it. That is definitely on my list of household tasks from now on.
Karen played a big role in this video. She spoke about how to use the concept of “copy canning” to build up your emergency food pantry. Essentially, whenever you eat something from your food supply, buy two next time you go to the grocery store. You’ll slowly build up a stock pile without going out and spending a lot of money all at once. She also has a segment on parking lot and vehicle safety, reminding everyone, but especially women, to be aware of your surrounds and vigilant everywhere you are, such as in the grocery store parking lot.
While watching this segment, I felt that it was unfortunate that her segments were so strictly gender based…Ron got to build the cool survival stuff and Karen got to talk about the food pantry. But I reminded myself of when this was filmed. Things really were different then as far as “prepping” being a more masculine thing to do. And the fact that they were bringing a woman into things in the first place was probably a big deal at the time. I even enjoyed watching their baby crawl around in some of the segments.
What really sets these videos apart is the fact that they’re real. Real knowledge from a real person who tells you how things are really going to go when you start making something. I’d recommend these videos for the beginning “prepper” or person who is worried about how they might survive in a SHTF fan situation. By watching this video you will get a lot of knowledge on how to use things you already have access to. You could watch many hours on YouTube without getting this much clear, concise education. I also recommend this video for kids who like DIY type projects. There’s a lot to learn for just about anyone here, even people who think they already know pretty much everything. Purchase this video and others from Stoney-Wolf Productions.
Although food storage is an essential part of your disaster preparation strategy, it is important that you supplement your food by hunting and gardening. Learning to hunt will serve you well in your quest for survival.
There are several methods of hunting and each has their own advantages and drawbacks. Some hunting methods require more skill than others. It is not necessary to master all of the skills, but it is a good idea to be familiar with the options, including tools you can use if you find yourself without a weapon. Here’s a list of 10 essential hunting skills you can practice for survival whether you are an experienced hunter or not.
1 – Firearm Proficiency Guns are commonly used by hunters. Although guns provide the most effective method of hunting, it is imperative that you are trained on how to safely use the weapon and that you practice your skills regularly.
2 – Archery A bow and arrow is also an effective tool for hunting. Learning how to shoot a bow and arrow takes a lot of practice, but it may be worth it. If you do not have a bow and arrow set on hand, you can fashion the bow with hardwood saplings and paracord.
3 – Setting Traps and Snares Snares are excellent tools for hunting. There are many styles of snares that require various degrees of skill to set up. They can be used to hunt a variety of animals. Once they are set up, you simply need to check them regularly to see if they have captured any prey.
4 – Alternate Techniques with Spear and Rocks A spear is one of the most primal weapons. They can be used for stabbing an animal or thrown at the target prey. A spear can be fashioned from a sharpened stick, or you can attach a spearhead made of bone, stone, wood or steel to the stick. Although they’re not the most effective hunting tool, rocks can be useful if you don’t have any other tools available. The effectiveness of this tool will depend on your strength and accuracy. You’ll have to get pretty close to the animal and throw the rock with enough force to stop the animal in its tracks.
5- Tracking Learn the game animals that are common in your area and the basics of their behavior. You might not find a proper track for a particular animal, but you might find where it has left fur or scratched a tree. Find where the herbivores go, because the carnivores will follow.
6- Covering Scents If you don’t have anything like or baking soda, which some people say works, or woodsy scent chips, pay close attention to the wind while you are tracking, and adjust your positioning if necessary. The slightest whiff of human will put some animals like deer on edge.
7- Field Dressing a Kill Nothing really replaces experience in this regard, but if you don’t have experience in breaking down an animal in the field, find a video to watch and get a general idea. You aren’t going to get far if you’re trying to carry around a whole elk or bear along with your day pack. And furthermore, make sure you have a good knife with you at all times.
8- Judging Distance Eyeballing distances, particularly after dark, does not come naturally to most humans. But if you’re trying to shoot and keep your use of ammunition or arrows to a minimum, this skill could be what saves you. There are things you can to do practice this skill, such as placing markers at 20, 30 and 40 yards and shining a light on them (at night) to see how much you can identify in each area. During the daytime, take note of rocks, trees or shrubs in the area that are at 10-yard increments.
9- Read a Topographic Map Learning how to read the contour lines of a map of your area is an important skill if you want or need to be able to bug out into the woods or mountains somewhere. The lines can tell you whether you’ll be hiking uphill, in a valley or across flat land. Combine that with knowledge of where your water systems are in your area, and you’ll have a very good idea of the environment. With this knowledge you’ll have a better chance of staying hidden — or of being found.
10- Navigate with a Map and Compass In the age of GPS, many people no longer know how to navigate with a basic paper map and magnetic north. If you know hot to do this, you’ll never be lost again. Think about it…a paper map won’t break or run out of batteries. A compass is breakable, but it works even with cloud cover.
We’re getting to know the Bushcraft series of books, because we already had “Bushcraft 101” by Dave Canterbury, then checked out “Advanced Bush Craft: An Expert Field Guide to the Art of Wilderness Survival” by Dave Canterbury, published by Adams Media. Now we’ve gotten our hands on the new one, “The Bushcraft Field Guide to Trapping, Gathering & Cooking in the Wild,” also by Dave Canterbury.
This one published October 1, 2016, so it’s brand new. And it’s also our favorite of the bunch. We had some criticisms of the past two books because the information Canterbury presents is focused on East Coasters and some of the information he chose to highlight didn’t seem that important. I’m happy to report that this one is full of more useful information. However, for advanced preppers or hunters, again, some of the information will seem silly. For instance, a list of veggies that can be carried that don’t require refrigeration, including potatoes.
I did love the diagrams of makeshift water filters using a two-liter soda bottle as a water filter or the tripod method using cloth. Using the bottle method, you cut the top off a bottle and invert it, layering fine to course sand and rocks to slow let water filter through.
If you have the opportunity to pack for your outing, there are many tips here that you can use. For instance, packing a few bags of spices or a box of Old Bay seasoning. He provides a long list of his favorite recipes that you can duplicate, such as jambalaya using ground sausage and fresh crawfish. There are extensive pages about ways to build cooking fires and stoves out of found materials, and “beyond the basics” of hunting which includes how to reload spent shells. My favorite parts of this book, which I thought were lacking in the previous book, was the short section including full color photos of edible plants and the foraging chapter. There’s also a section that goes more in-depth into trapping and butchering, which are key considerations for living off the land. Useful in this regard also is the chapter on preparing unconventional foods, such as insects. I ate crickets once at a Mexican restaurant in Las Vegas, and I can tell you that in this case that box of Old Bay would come in handy.
The foraging chapter is great info, provided you know how to identify the plants he’s talking about. If you don’t know how to identify yarrow, it won’t help you to know that it can be used as a natural insect repellent. I think that’s what’s the biggest source of frustration about these books, is that they are a mix of beginner and advanced knowledge, and sometimes where the line is drawn is a little arbitrary. For instance, if you’re already including full color photos of edible plants, why not include one of yarrow as well. On the other hand, this puts a lot of the responsibility on you, the reader, to make sure you know what plants grow in your area and how you might use them.
To wrap things up in a fun manner, I liked that there is a chapter on unconventional cooking, which includes things like cooking cheese bread on your car engine. This is something I’ve always wanted to try to do and this recipe has given me the push to try it. This is a book that you can just flip through and get something out of, if you want to learn how to make a stove out a tin can, for instance. But I recommend taking the time to sit down and read it, because there are lots of tips and tricks that even if you know, you might forget. For instance, I’m going to go around and gather sap, knowing that sap will burn for a long time. I know that I could heat up a can of beans on a fire of sap if I needed to. And I never would have thought that I could use a windshield reflector, the fold-up kind, to fashion a stove.
One thing that I think is a bit confusing about these books is that people who may not realize what they are buying will think they are getting a survival book. While many of the techniques such as making stoves and building utensils out of saplings can definitely be survival skills, there’s too many other things in the book that are not specific to survival, like what spices to keep on hand. However, there’s enough that is new and useful in this book that I recommend it for people who hunt and like to fashion what they use out of things they find along the way, or for people ho have a genuine interest in doing things in an off-the-grid manner, even if it’s just a weekend at a time.
While storms that spawn tornadoes are thought of as being primarily a spring thing, because the majority of tornadoes occur from April through June. But the reality is that tornadoes can happen at any time of year. In fact, an F-2 tornado just ripped through an industrial park in Windsor, Ontario, Canada on August 25. If you live in a tornado zone, then how to survive a tornado is something you probably grew up preparing for. People visiting a tornado-prone area or just driving through, however, may not know what to do.
And, just because you don’t live in “tornado alley” is no reason to be complacent–tornadoes have touched down in all 50 states. In 2012, twin tornadoes touched down in Brooklyn and Queens in New York in September, with winds of about 70 mph. An F-4 tornado occurred at 10,000 feet in northwest Wyoming on July 21, 1987. Although that was a rare meteorological event, never assume that just because you’re at a high altitude that you don’t need to be aware of the weather. Tornadoes can occur whenever and wherever conditions are right.
Tornado ratings
Modern measurements use a system called the Enhanced Fujita Scale for rating the intensity of tornadoes. The scale is named after Dr. Ted Fujita, a storm scientist at the University of Chicago who developed the sale in 1971. The scale ranges from F-0 to F-5, with 5 being the most severe storm. Approximate wind speeds for each category range from 65 to 85 mph for F-0 to greater than 200 mph for F-5.
Damage That Can Be Expected
According to Weather.com, the following chart summarizes the damage that can be expected from a tornado at each level of intensity.
F-0
Wind speeds: 65 to 85 mph
Typical Observations: Light damage. Peels surface off some roofs; some damage to gutters or siding; branches broken off trees; shallow-rooted trees pushed over.
F-1
Wind speeds: 86 to 110 mph.
Typical Observations: Moderate damage. Roofs severely stripped; mobile homes overturned or badly damaged; loss of exterior doors; windows and other glass broken.
F-2
Wind speeds: 111 to 135 mph.
Typical Observations: Considerable damage. Roofs torn off well-constructed houses; foundations of frame homes shifted; mobile homes completely destroyed; large trees snapped or uprooted; light-object missiles generated; cars lifted off ground.
F-3
Wind speeds:136 to 165 mph.
Typical Observations: Severe damage. Entire stories of well-constructed houses destroyed; severe damage to large buildings such as shopping malls; trains overturned; trees debarked; heavy cars lifted off the ground and thrown; structures with weak foundations blown away some distance.
F-4
Wind speeds: 166 to 200 mph.
Typical Observations: Devastating damage. Whole frame houses Well-constructed houses and whole frame houses completely leveled; cars thrown and small missiles generated.
F-5
Wind speeds: more than 200 mph.
Typical Observations: Incredible damage. Strong frame houses leveled off foundations and swept away; automobile-sized missiles fly through the air in excess of 100 m (109 yd); high-rise buildings have significant structural deformation; incredible phenomena will occur.
Characteristics
About 1,200 tornadoes hit the United States each year. The energy of a tornado is concentrated in a relatively small area perhaps only a hundred yards across. In the U.S. tornadoes are most common in the central plains of North America, east of the Rocky Mountains and west of the Appalachian Mountains. They also occur in other parts of the world. They usually occur during the late afternoon and early evening. Winds that reach 300 mph can rip homes to shreds and even strip asphalt from pavement, pick up cars like toy blocks and send dangerous objects like tree limbs flying through the air. Tornadoes can only be predicted to a limited extent. People describe the sound of a tornado as that of a very loud train or jet engine.
Tornadoes can occur whenever the surface temperature is much warmer than the air higher up. Warm air near the surface rises and carries with it condensation, which leads to clouds and thunderstorms. If the winds are right, a tornado is possible.
Wall cloud. Public domain photo by Brad Smull, NOAA Photo Library
Learn how to recognize the cloud formations and weather conditions that are likely to lead to tornadoes. These are wall clouds, although a wall cloud is not always present. You may also not be able to see a wall cloud depending on your angle of view. A wall cloud is a cloud that forms below a thunderstorm cloud and abruptly lowers. A funnel cloud often extends from the base of a cloud and looks like a rotating cone. If the funnel cloud touches the ground it becomes a tornado. However, some tornadoes may not have a funnel cloud.
Tornado Watches and Tornado Warnings
A “tornado watch” means severe, tornado-producing weather is possible over a period of a few hours. You need to be alert, and be prepared to seek shelter if tornadoes happen or a warning is issued. A “tornado warning” means that a tornado has been spotted, or that Doppler radar shows a thunderstorm circulation which can spawn a tornado. When a tornado warning is issued for your area, seek safe shelter immediately.
How to Survive a Tornado
Tornadoes travel at around 10 to 20 mph, even if their wind speed is much greater than that. Outrunning on one foot is not possible, but in a car, if you have advance warning that it’s coming, you have a chance. Try and gauge the tornado’s movement and direction and drive away only if you’re sure the tornado is not coming towards you. Drive away at a right angle to the direction the tornado is moving–in other words, in a direction that puts the most distance between you and the tornado.
If you’re stuck in a car, the Red Cross recommends getting off the road, parking the car, and slouching down low in your seat while still keeping your seat belt on. Lean away from the windows and cover your head with something to keep broken glass off you.
Seek strong shelter or at least take some cover like covering yourself with a mattress or a sturdy desk. The biggest danger is flying debris. If you’re in a house or building with a basement, go there. Some buildings may have storm shelters. Use them. If you aren’t sure where to go, go to an interior room or bathroom, far from windows. Crouch, covering your head and face.
If you’re outside, like flat on the ground or in a ditch. Try to pick a spot away from trees and buildings. If you’re driving, consider getting out of your car and running to safe place, because a twister can easily pick up a car and throw it like it’s nothing. Trying to get under and overpass or bridge is not a good idea, either. A tornado could collapse the bridge.
Advanced Bush Craft: An Expert Field Guide to the Art of Wilderness Survival by Dave Canterbury, published by Adams Media.
Maybe you grew up in a household of people who hunted and fished, owned a variety of weapons and prepped for disasters. Maybe you were in the military and learned how to survive on limited resources. If neither of these things is true for you, like it was for me, it’s likely that everything you learned about survival came from watching videos and reading books.
There are a lot of resources out there for survival, and this book, written by Dave Canterbury, is one to consider if you’re ready to learn more about making do when you either can’t or don’t want to rely on store-bought stuff. Canterbury also wrote the book “Bushcraft 101” which was on the New York Times Bestselling list.
The first part of the book is about building your kit. Canterbury walks through the categories of things you need and thinking about when you might need them. For instance, naturally you will take more things if you are going out on a long trip, but the short day trips are good times to practice doing things like carving a throwing stick. Canterbury relied on a lot of tools in “Bushcraft 101,” but this new book focuses on the few tools you really need to make other things you will need along the way.
A lot of attention is paid to fire making, particularly the bow and drill method. After reading this section, anyone should be able to gather the materials to start a fire, and if you can’t, there’s always the option of just packing along a magnifying glass if it’s sunny.
Canterbury is from Ohio, and many of his resources are focused on the East Coast. For instance, did you know that eastern pine needles have more vitamin C than a fresh orange? They’re also good for vitamin A, so these would make a nutritious tea. But as a person who lives on the West Coast, that doesn’t help me, and Canterbury doesn’t list western species that may be similar.
The chapter on knot making leads into basketry and weaving. He provides instructions for making a “woodland loom” using a sapling, lashings and crossbars. This set-up lets you make large-scale items like sleeping mats or shelter coverings. He devotes several pages to different weaving techniques. This isn’t likely a skill that people are particularly concerned about if they’re just going out for the weekend, but as Canterbury says in the introduction of the book, this book is designed for what you will need to know to be prepared for a lengthy stay in the wilderness.
I particularly enjoyed the sections about sheltering and trapping, but in both I found evidence that perhaps this book is not quite as “advanced” as some readers might be expecting. For instance, in the sheltering section a half-page diagram is included on driving tent stakes in at an angle rather than straight down. The trapping section starts out with statements that understanding animal behavior including what they eat, where they live and where they travel is key to successfully being able to hunt animals. Those two things seem like common sense, so as long as readers go into this book understanding they are not getting 100% advanced, previously unrevealed knowledge and take these tidbits as gentle reminders, they’re likely to enjoy this book.
I found the book to be a somewhat frustrating combination of useful knowledge along with things that seemed like they took up unnecessary space. For instance, almost a whole page diagramming the shapes of different axe heads and a chart on when to look for berries to eat. Again, the wild foods and trees are focused on what is in the Eastern woodlands, like blueberries, which don’t grow wild on the West Coast. And I think most people know that strawberries ripen in summertime. What would help me most is some drawings showing some other edible wild foods that can be found everywhere and how to shape a stone into a useful cutting edge. I don’t really care if it is a Kentucky axe or a Southern Kentucky axe, or a Virginia axe or a regular Wisconsin as long as I can make a useful cutting edge from what materials I have around me.
Given the amount of space he took up with firestarting, I would have liked a few more diagrams and information about making arrows. As I read the book I began to get more frustrated that there wasn’t more of what I wanted to know about while so much space was taken up by things that seemed like they belonged in a reference book. The chapters on metalsmithing and boat building felt more complete. There’s even a recipe for squirrel stew, so once you make your throwing stick from chapter 3 and your fire from chapter four, you’re all set to focus on building the log cabin from chapter 5 with a recipe in hand for the first meal you’ll make in your new hand-constructed shelter. I truly enjoyed the chapter of appendices providing information on things like navigating using shadows and star positioning and with some practice using the star positioning system he explains, I know I’ll be able to tell what direction I’m heading in as long as I can see the sky.
Overall, the book is about survival in the sense that you are getting deeper skills than what you might normally get into, like preserving acorns for flour. It’s not a book about meeting immediate needs so much as it is about planning, gathering materials and crafting tools for long-term use if you truly can’t purchase things from a store. Even though it’s not all what I consider advanced knowledge, you will definitely learn something from this book. Purchase “Advanced Bush Craft: An Expert Field Guide to the Art of Wilderness Survival” by Dave Canterbury from Amazon.